Five new Elastic Cloud Hosted APIs replace a painful pattern: fetching a full deployment plan, editing topology elements by hand, and resubmitting the whole thing just to change one tier or bump a version. Upgrade, scale, configure, tag and share snapshot repositories, each with a single targeted API call. The same validators apply, and every operation is available in the Elastic Cloud Console too. If you run more than a handful of deployments, this is the fleet operations surface you've been waiting for.
Here's what's new.
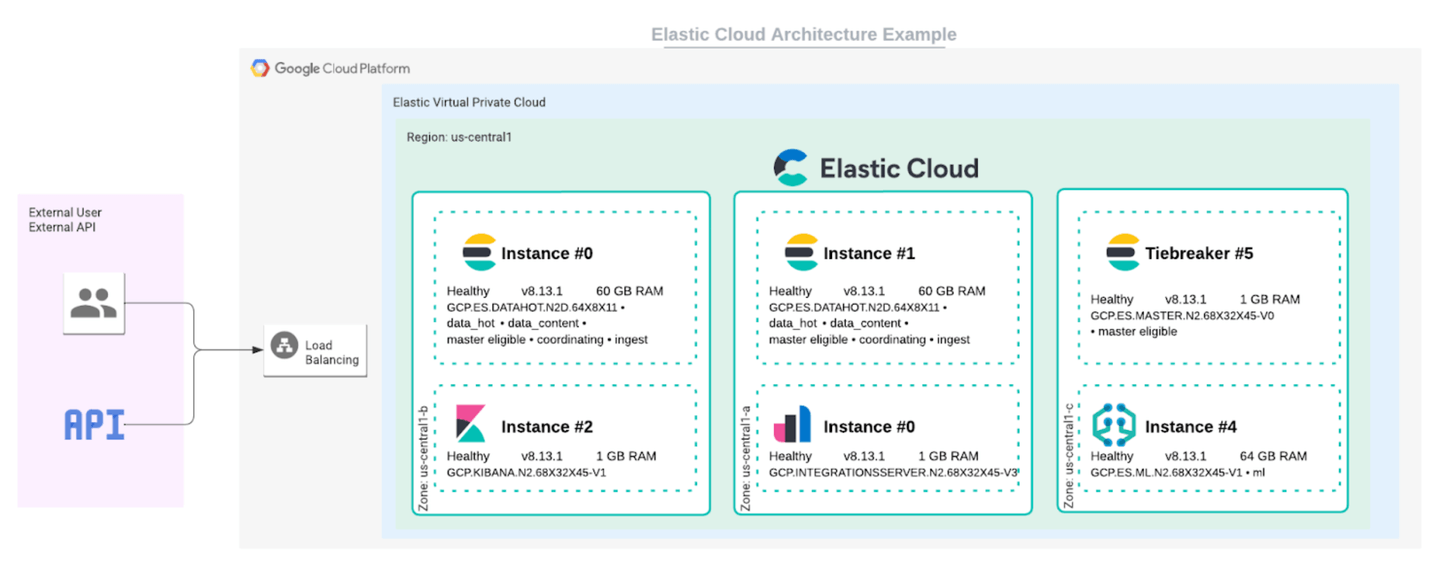
How to upgrade an Elastic Cloud Hosted deployment via API
Upgrade API: POST /deployments/{id}/upgrade
Upgrading an Elastic Stack version across all resources in a deployment used to require you to construct and submit a full deployment plan update. Now, you can upgrade every resource in a deployment (Elasticsearch, Kibana, and all other components) to a target Elastic Stack version with one API call.
curl -X POST https://api.elastic-cloud.com/api/v1/deployments/{deployment_id}/upgrade \
  -H "Authorization: ApiKey $EC_API_KEY" \
  -H "Content-Type: application/json" \
  -d '{"target_version": "9.4.0"}'
This pays off most when you operate many deployments and want to roll a new Elastic Stack version across your fleet quickly.
How to resize Elasticsearch tiers in Elastic Cloud Hosted
Scale API: GET / PATCH /deployments/{id}/elasticsearch/{ref_id}/tiers
The tiers API lets you resize any Elasticsearch tier (hot, warm, cold, frozen, master, coordinating or ML) with a single PATCH request scoped only to the tiers you want to change.Send a body keyed by tier ID. Anything you don't mention stays exactly as it was, so you can change one tier in isolation without touching the others.
curl -X PATCH https://api.elastic-cloud.com/api/v1/deployments/{deployment_id}/elasticsearch/main/tiers \
  -H "Authorization: ApiKey $EC_API_KEY" \
  -H "Content-Type: application/json" \
  -d '{
    "hot_content": {
      "memory_size": 4096,
      "zone_count": 2
    },
    "warm": {
      "memory_size": 5120,
      "zone_count": 1
    },
    "master": {
      "memory_size": 1024,
      "zone_count": 3
    }
  }'
A few things to know:
- Valid tier IDs are
hot_content,warm,cold,frozen,master,coordinating, andml. Invalid keys are rejected with the list of tiers you can use. memory_sizeandzone_countare each optional per tier. Include only the one you want to change; the other stays untouched.- Dedicated master handling is automatic. Include
masterwithmemory_sizeandzone_countgreater than zero, and the endpoint flips thehot_contenttier out of the master-eligible role so your new dedicated masters take over. Includemasterwithmemory_sizeset to zero, and thehot_contenttier resumes acting as master-eligible. No separate flag to manage. - Same validation as the full plan API. The modified plan runs through the existing validators, so size-vs-instance-configuration mismatches, zone-count limits, and topology rules are enforced consistently.
For teams automating tier-level scaling based on ingest load, rebalancing zones before a maintenance window, or promoting a deployment to dedicated masters as it grows, this collapses what used to be a multistep plan edit into a single targeted request.
How to update elasticsearch.yml settings in Elastic Cloud Hosted
User Settings API: GET and PUT /deployments/{id}/{resource_kind}/{ref_id}/user_settings
User-defined settings on a running deployment (elasticsearch.yml-style overrides, Kibana settings, APM config) now have their own endpoints. Read or update them directly with a focused JSON request, scoped to a single resource.
The endpoints cover Elasticsearch, Kibana, Elastic APM, App Search, Enterprise Search, and Integrations Server. Same endpoint shape across all of them; only the {resource_kind} path segment changes.
Read the current settings for a resource:
curl https://api.elastic-cloud.com/api/v1/deployments/{deployment_id}/elasticsearch/main/user_settings \
  -H "Authorization: ApiKey $EC_API_KEY"
Update them with a JSON body containing only the keys you want set:
curl -X PUT https://api.elastic-cloud.com/api/v1/deployments/{deployment_id}/elasticsearch/main/user_settings \
  -H "Authorization: ApiKey $EC_API_KEY" \
  -H "Content-Type: application/json" \
  -d '{
    "search.allow_expensive_queries": false,
    "indices.recovery.max_bytes_per_sec": "200mb"
  }'
A few things to know:
- JSON in, JSON out. A JSON contract that's easy to template, diff, and check into source control.
- Existing YAML is auto-migrated. Any tier-level user settings you currently have in YAML are converted to JSON the first time you
PUT, so existing deployments work without a manual rewrite or a one-time migration step. - Allowlist and denylist rules still apply. Settings the platform doesn't permit are rejected with the same validation the full plan API runs.
- Asynchronous. The action is acknowledged immediately and applied in the background, consistent with the other targeted endpoints in this release.
- Non-breaking. The full
PUT /deployments/{id}endpoint continues to work; this is an additive surface, not a replacement.
For teams that tune settings as part of a release, sweep a configuration change across a fleet, or want to manage cluster overrides as code, this is a single targeted PUT per deployment.
How to manage deployment tags in Elastic Cloud Hosted
Tags API: GET and PUT /deployments/{id}/tags
Deployment tags attach metadata (environment, owner, cost center, application) to deployments for filtering, reporting, and policy. The Tags API gives you a GET for the current tags and a PUT to replace them, both in one targeted call.
curl -X PUT https://api.elastic-cloud.com/api/v1/deployments/{deployment_id}/tags \
  -H "Authorization: ApiKey $EC_API_KEY" \
  -H "Content-Type: application/json" \
  -d '{"tags": [{"key": "env", "value": "prod"}, {"key": "owner", "value": "search-platform"}]}'
PUT replaces all tags on the deployment. Validation enforces up to 64 tags per deployment, keys up to 32 characters, and values up to 128 characters, with explicit 400 errors on violations. Authorization follows the same model as the deployment update endpoint.
How to link snapshot repositories across Elastic Cloud Hosted deployments
Snapshot repository APIs: Full CRUD at /deployments/{id}/elasticsearch/{ref_id}/snapshot/repository, plus a new Elastic Cloud console workflow
A common operational pattern in ECH is needing one deployment to access snapshots from another: migration validation, populating a staging environment, or selectively restoring one tenant's indices across a fleet. Snapshot repository linking lets you do this without copying full snapshot data into a new deployment.
The capability creates a link between a source deployment's managed snapshot repository and a target deployment. The target can browse the source's snapshots and restore only what it actually needs; nothing is copied at link time. Cross-bucket credentials and the repository are wired up for you, given your user has an admin role over both deployments.
This works specifically and only for Elastic Cloud managed snapshot repositories, whose credentials are managed by Elastic Cloud.
You can manage these links in two ways: from the Elastic Cloud console UI for ad hoc, point-and-click work, or via the API for automation and infrastructure-as-code workflows.
Link snapshot repositories from the Elastic Cloud console
For one-off restore drills, staging refreshes, or anytime you'd rather not script it, the Elastic Cloud console now provides a guided flow to link a source deployment's snapshot repository into a target deployment. Open the target deployment, go to the snapshot repository management screen, pick the source deployment from the list of deployments you have access to, and confirm. The console handles credentials and registration behind the scenes. No JSON, no keystore wrangling.
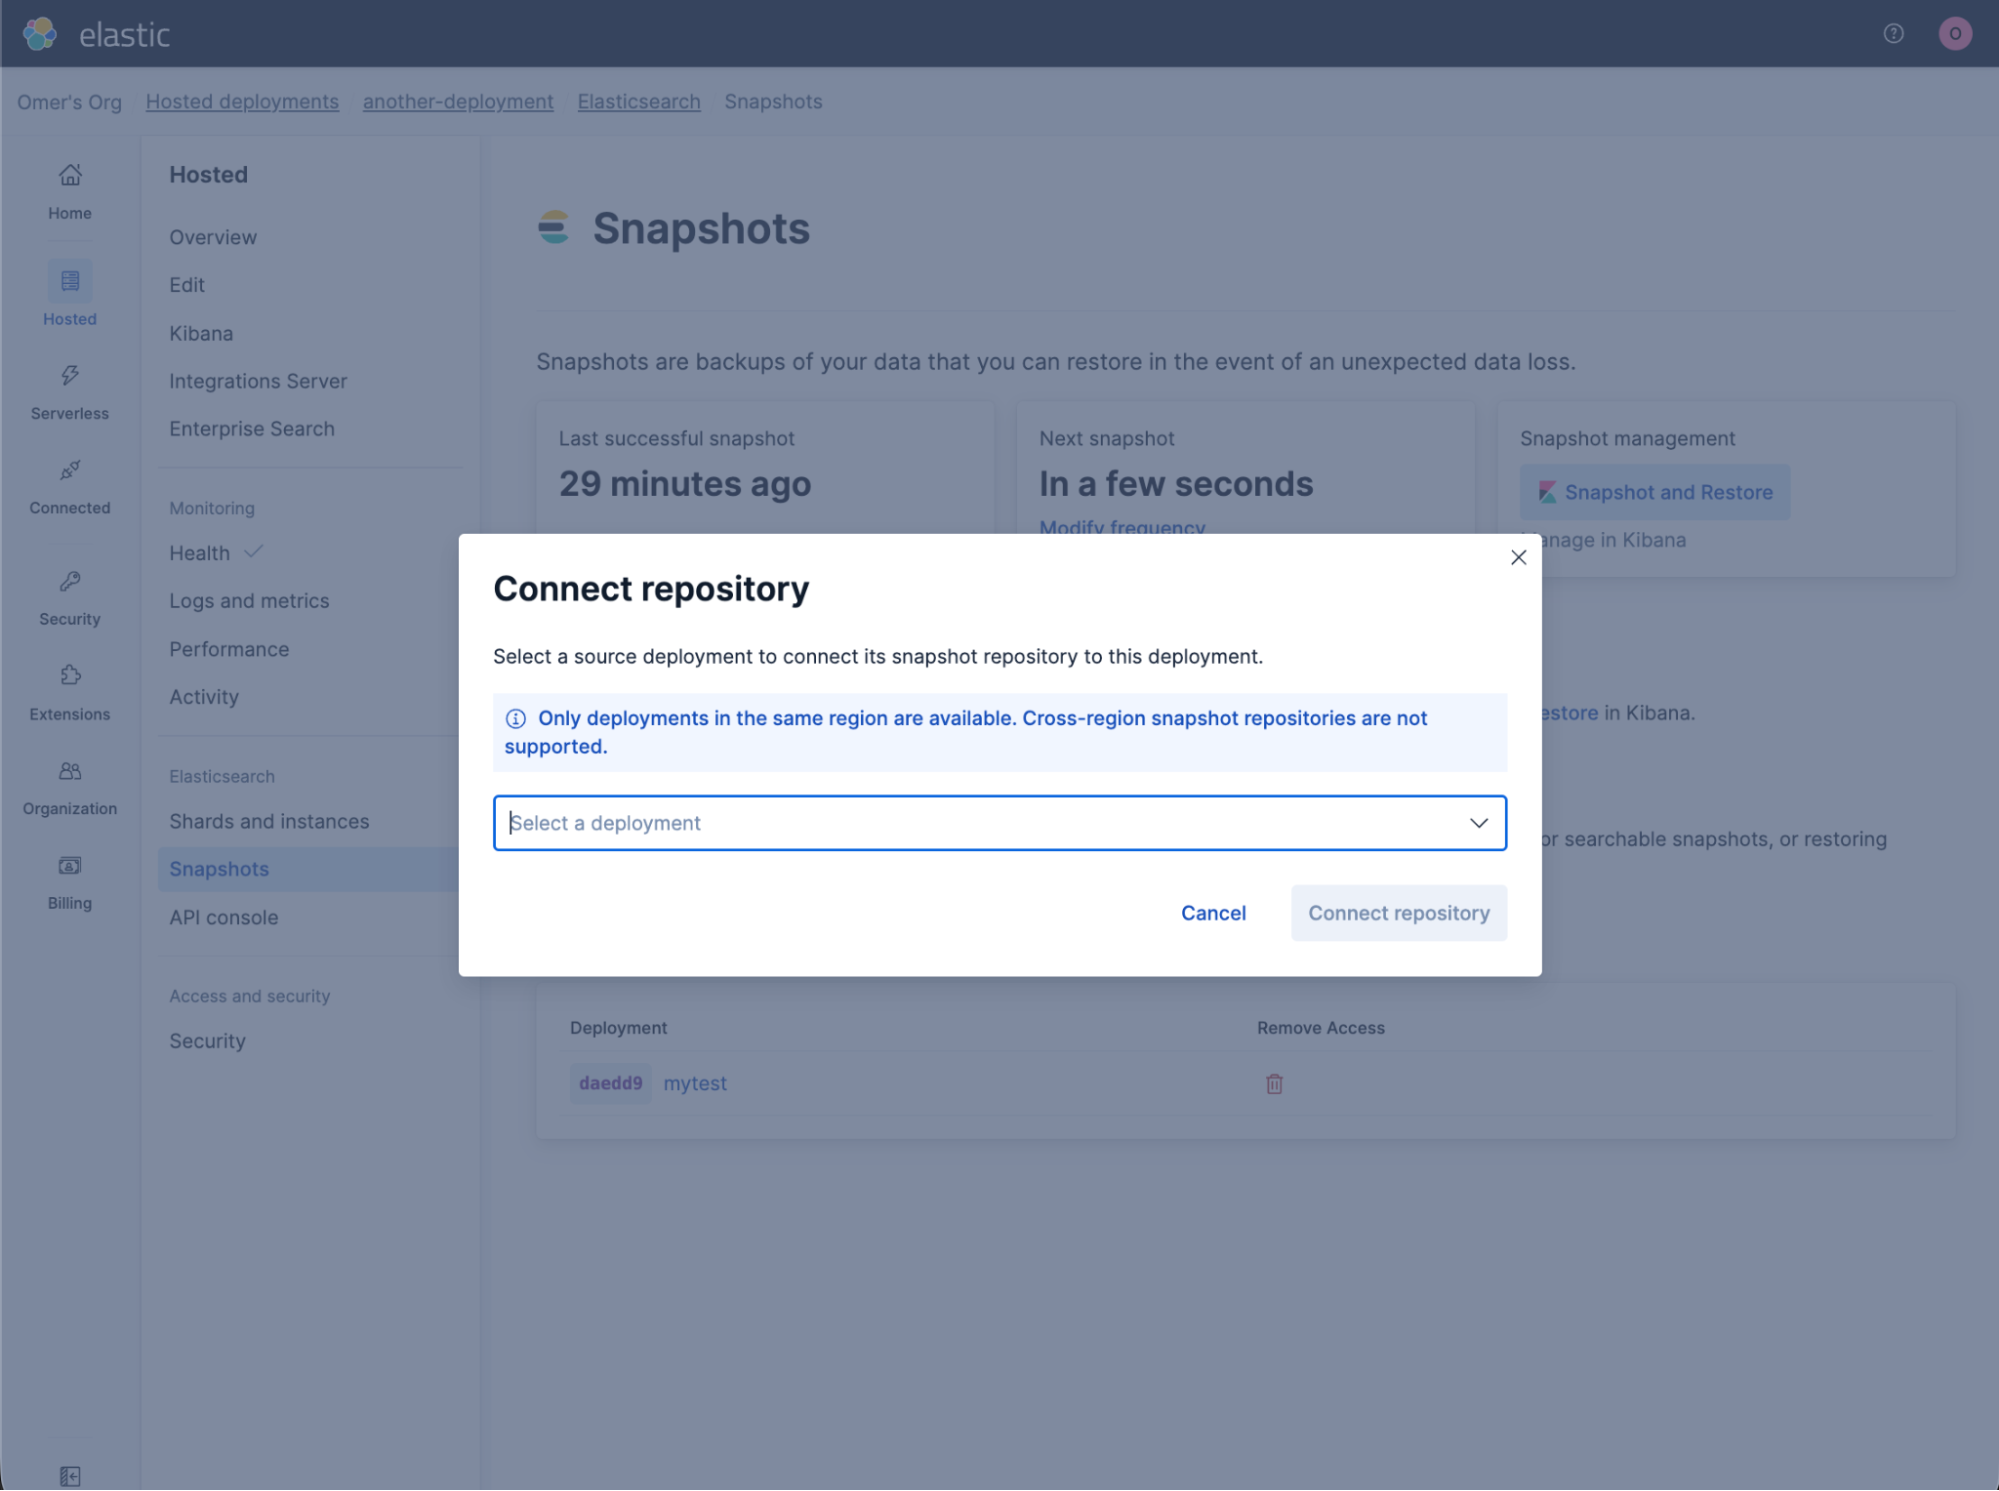
Once the link is in place, the same screen lists all linked deployments:
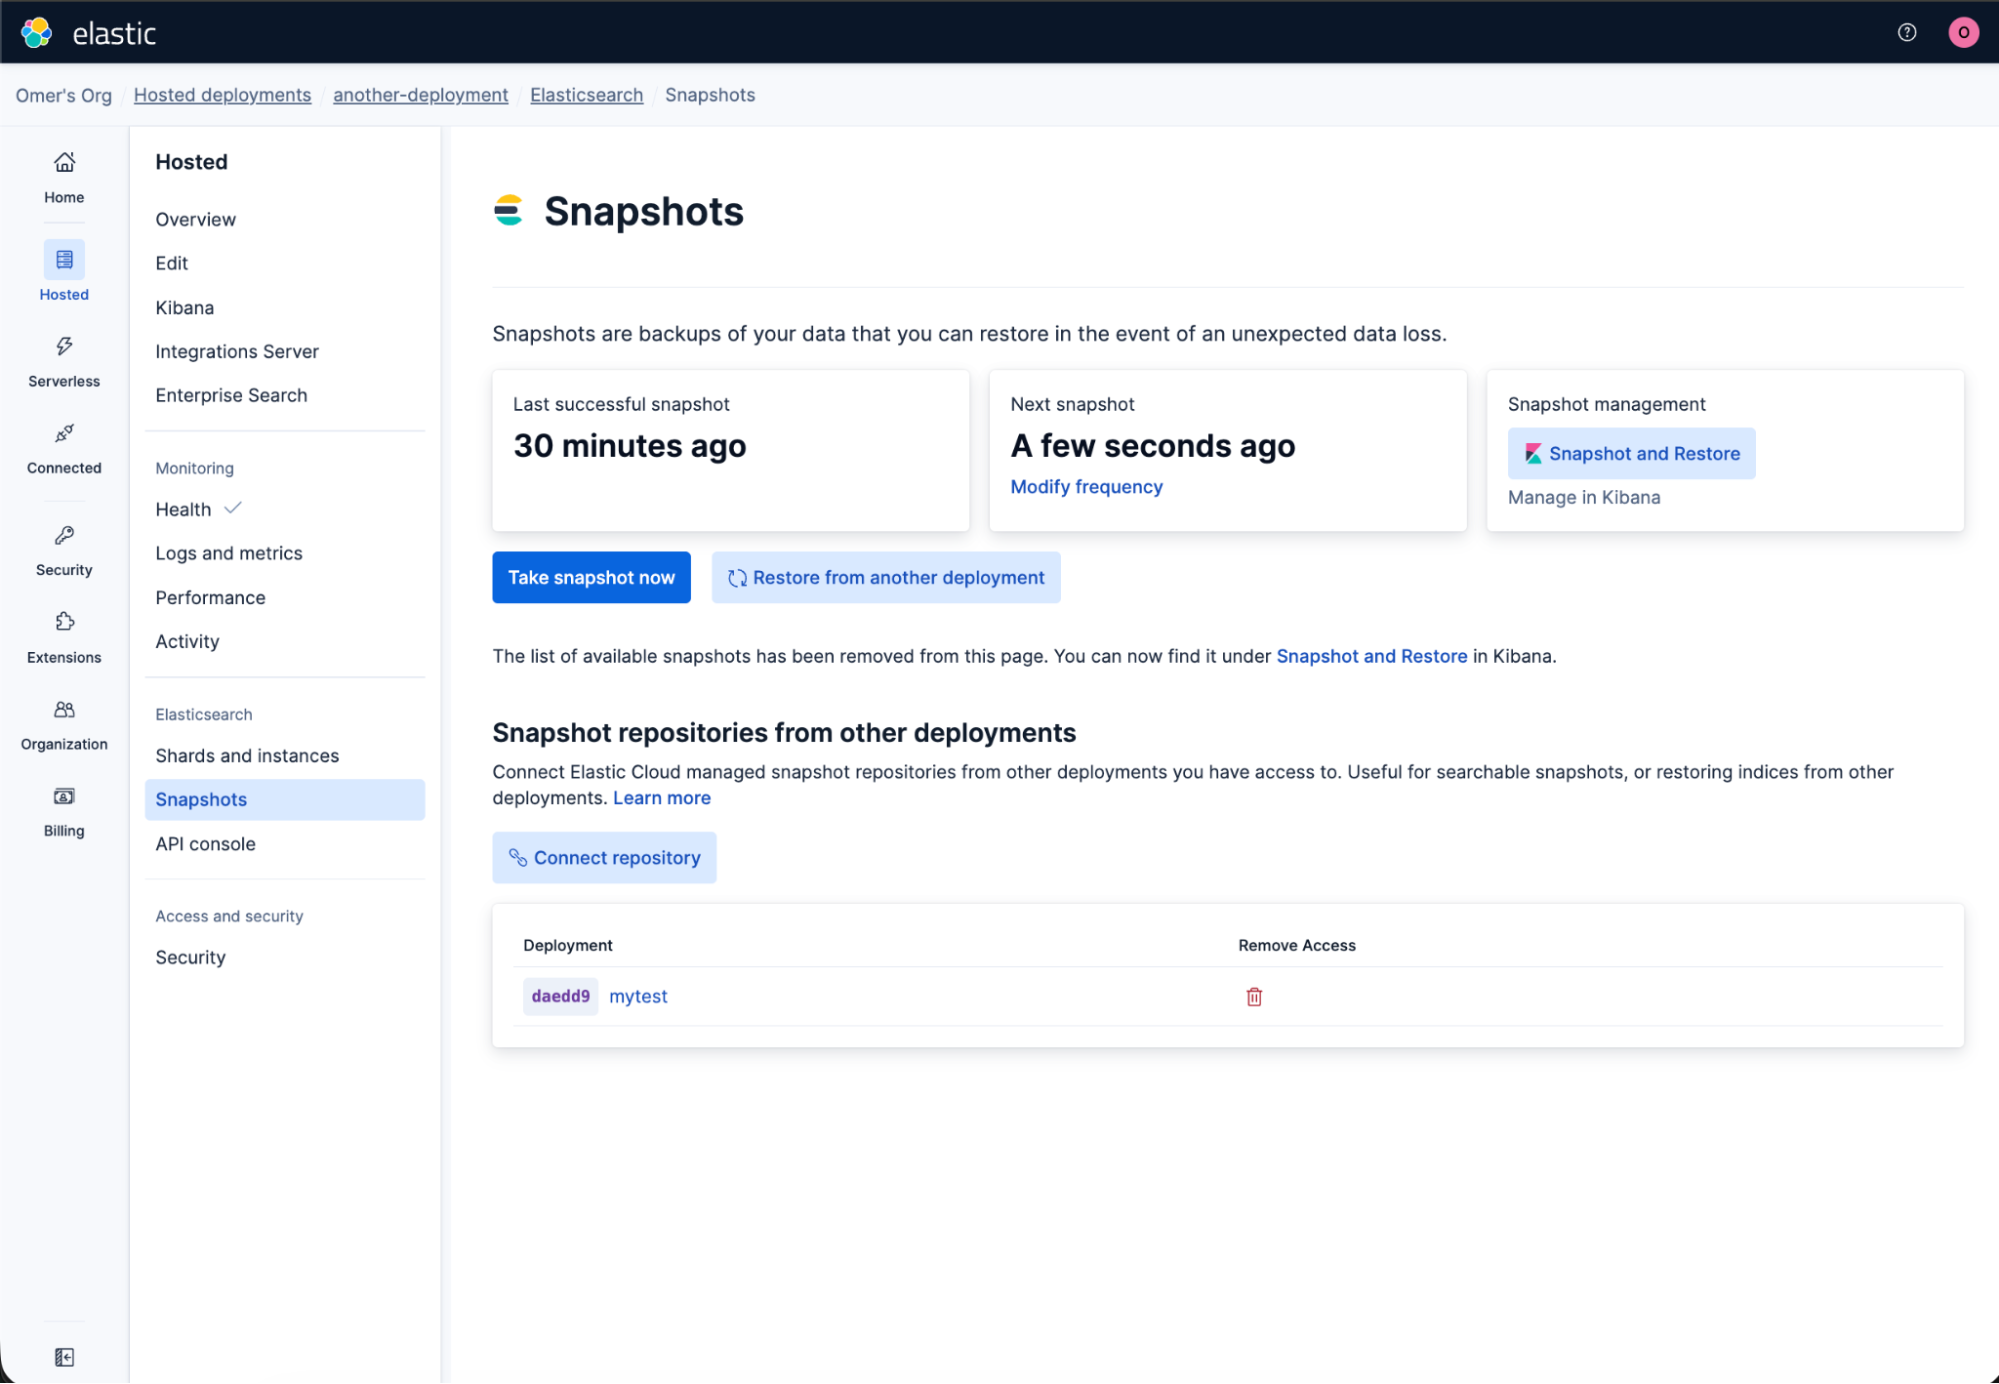
Removing a link is equally direct: Pick the linked repository, and unlink it. The source deployment is unaffected; only the read-only link from the target is torn down.
Manage repositories linking via the API
The snapshot repository linking operations (create, list, delete) are also available as API endpoints for automation and infrastructure-as-code workflows.
Create a link
curl -X POST https://api.elastic-cloud.com/api/v1/deployments/{target_deployment_id}/elasticsearch/{ref_id}/snapshot/repository \
  -H "Authorization: ApiKey $EC_API_KEY" \
  -H "Content-Type: application/json" \
  -d '{
    "source_deployment_id": "<source-deployment-id>"
  }'
The endpoint is idempotent. A retry after a partial failure picks up where the previous attempt left off, so you don't end up with half-configured links. The work runs asynchronously: You get an immediate acknowledgment, and the Elastic Cloud control plane handles the rest (fetching the source repository configuration, injecting credentials into the target cluster's keystore, and registering the read-only repository in Elasticsearch). The linking proceeds, provided the caller has the right permissions on both deployments.
List linked snapshot repositories
curl https://api.elastic-cloud.com/api/v1/deployments/{deployment_id}/elasticsearch/{ref_id}/snapshot/repository \
  -H "Authorization: ApiKey $EC_API_KEY"
Each entry in the response includes a repository_name field with the actual name of the repository as registered in Elasticsearch (for example, _clone_abcd1234). You don't need to derive it from internal ID conventions; take the name straight from the response, and use it anywhere you'd reference a repository in the Elasticsearch snapshot and restore APIs.
Remove a link
curl -X DELETE https://api.elastic-cloud.com/api/v1/deployments/{deployment_id}/elasticsearch/{ref_id}/snapshot/repository/{repository_name} \
  -H "Authorization: ApiKey $EC_API_KEY"
DELETE takes the repository_name directly (the same value returned from GET above). That keeps the API symmetric and avoids looking up the source deployment by ID when you're tearing a link down.
A typical lifecycle:
POST   .../snapshot/repository            (link target → source)
GET    .../snapshot/repository            (confirm the link, read back repository_name)
DELETE .../snapshot/repository/{name}     (unlink when done)
This is particularly useful for multi-environment workflows where a staging deployment reads from production snapshots, tenants-per-cluster setups that need selective restores, or multitenanted restore processes that require a specific index restore.
Choosing instance configurations per tier in Elastic Cloud Hosted
Instance configuration customization: Elastic Cloud console UI
Elastic Cloud Hosted now lets you pick an instance configuration per data tier (hot, warm, cold, frozen) directly from the Elastic Cloud Console.
Match deployment hardware to a specific workload by picking an instance configuration per data tier (hot, warm, cold, frozen):
- Navigate to your deployment's overview page, and click Edit on the hardware profile.
- In the hardware profile flyout, select the instance configuration that best fits each data tier's workload.
- Review the changes, and click Update. A confirmation dialog shows exactly what will change before you apply.
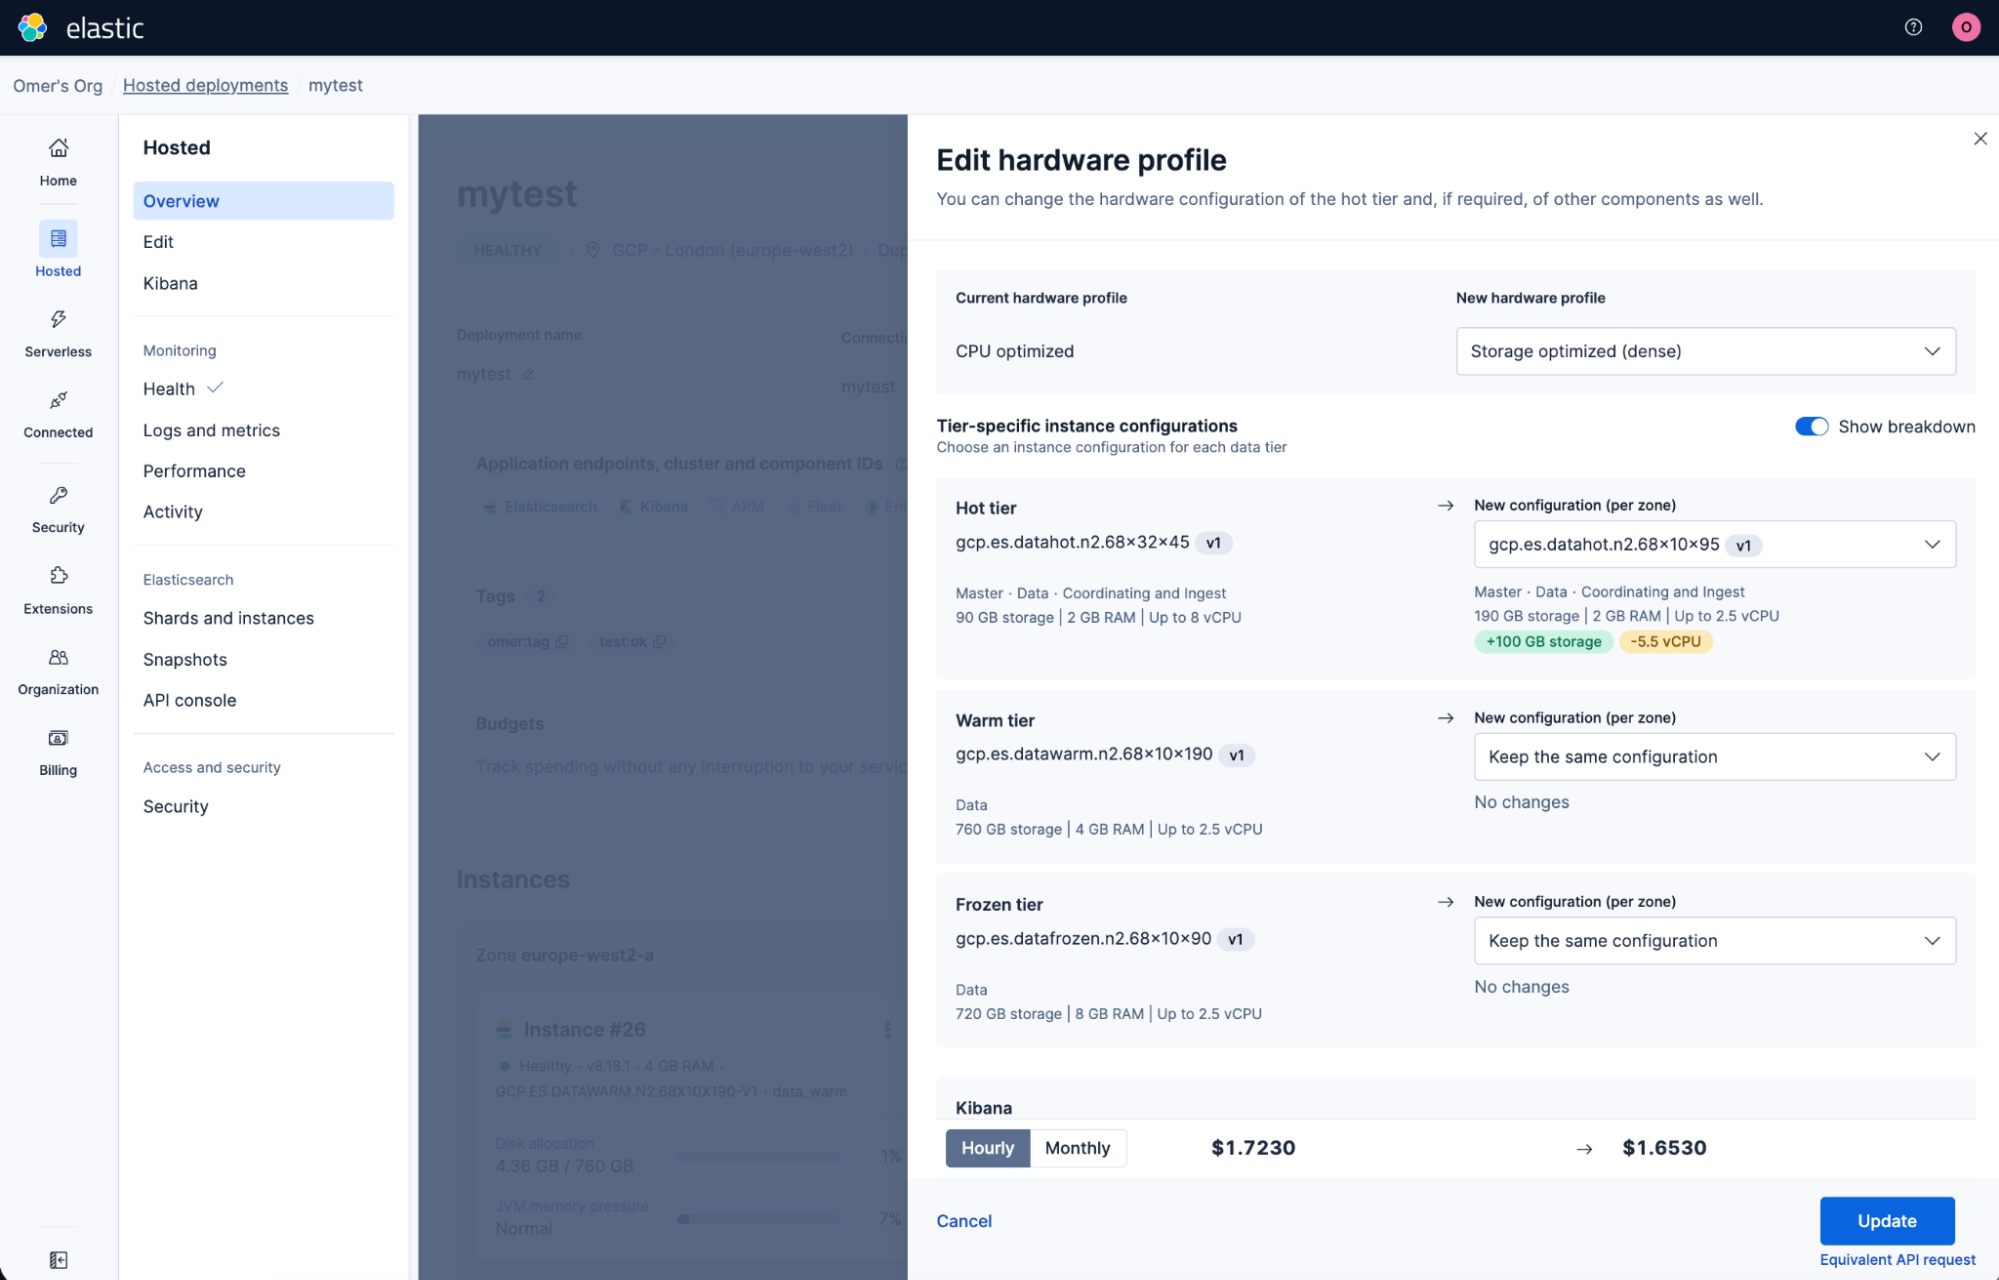
Whether you need more storage density on your warm tier, higher compute on hot for search-intensive workloads, or want to move to a newer machine type in your region, you can now make that change from the console instead of crafting API requests. If your selection aligns with an existing hardware profile, that profile is automatically applied. Otherwise, the deployment is labeled custom, and any combination supported by your region is allowed.
The API continues to support instance configuration changes for both data tiers and stateless resources (Kibana, machine learning [ML] nodes, master nodes) for automation use cases.
Full documentation for instance configuration customization is available in the Elastic Docs.
Elastic Cloud Hosted API reference: upgrade, scale, configure, tag, snapshot
These endpoints, plus the new Elastic Cloud console workflows, give ECH a verb-shaped surface for fleet operations: upgrade, scale, set, tag, share, customize. One call per operation, the same validators as the full deployment plan, available from API and Terraform. That's what makes fleet-scale automation practical.
| API | Endpoint | What it does |
|---|---|---|
| Upgrade | POST /deployments/{id}/upgrade | Upgrades all resources to a target Elastic Stack version |
| Tiers | PATCH /deployments/{id}/elasticsearch/{ref_id}/tiers | Resizes one or more tiers without touching others |
| User settings | PUT /deployments/{id}/{resource_kind}/{ref_id}/user_settings | Reads/updates elasticsearch.yml and Kibana settings |
| Tags | PUT /deployments/{id}/tags | Reads/replaces deployment tags |
| Snapshot repository | POST/GET/DELETE /deployments/{id}/elasticsearch/{ref_id}/snapshot/repository | Links, lists, and removes snapshot repository links |
Get started:
- Already on Elastic Cloud Hosted? Generate an API key from your Elastic Cloud account page, and try the examples above. Full reference is in the Elastic Cloud API documentation.
- Prefer infrastructure as code? The Elastic Cloud Terraform provider wraps these APIs for declarative deployment management.
- New to Elastic Cloud? Start a free trial, and deploy your first cluster in minutes.
Ready to try this out on your own? Start a free trial.
Want to get Elastic certified? Find out when the next Elasticsearch Engineer training is running!
Related content

October 15, 2025
Training LTR models in Elasticsearch with judgement lists based on user behavior data
Learn how to use UBI data to create judgment lists to automate the training of your Learning to Rank (LTR) models in Elasticsearch.

May 21, 2024
Elasticsearch delivers performance increase for users running the Elastic Search AI Platform on Arm-based architectures
Benchmarking in preview provides Elasticsearch up to 37% better performance on Azure Cobalt 100 Arm-based VMs.
May 21, 2024
Elastic Cloud adds Elasticsearch Vector Database optimized profile to Microsoft Azure
Elasticsearch added a new vector search optimized profile to Elastic Cloud on Microsoft Azure. Get started and learn how to use it here.
April 25, 2024
Elastic Cloud adds Elasticsearch Vector Database optimized instance to Google Cloud
Elasticsearch's vector search optimized profile for GCP is available. Learn more about it and how to use it in this blog.