Context Engineering is becoming increasingly important in building reliable AI Agents and architectures. As models get better and better, their effectiveness and reliability depend less on their trained data and more on how well they’re grounded in the right context. Agents that can retrieve and apply the most relevant information at the right time are much more likely to produce accurate and trustworthy outputs.
In this blog, we’ll use Mastra to build a knowledge agent that remembers what users say and can recall relevant information later, using Elasticsearch as the memory and retrieval backend. You can easily extend this same concept to real-world use cases, think support agents that can remember past conversations and resolutions, allowing them to tailor responses to specific users or surface solutions faster based on prior context.
Follow along here to see how to build it step by step. If you get lost or just want to run a finished example, check out the repo here.
What is Mastra?
Mastra is an open-source TypeScript framework for building AI agents with swappable parts for reasoning, memory, and tools. Its semantic recall feature gives agents the ability to remember and retrieve past interactions by storing messages as embeddings in a vector database. This allows agents to retain long-term conversational context and continuity. Elasticsearch is an excellent vector store to enable this feature, as it supports efficient dense vector search. When semantic recall is triggered, the agent pulls relevant past messages into the model’s context window, allowing the model to use that retrieved context as the basis for its reasoning and responses.
What you need to get started
- Node v18+
- Elasticsearch (version 8.15 or newer)
- Elasticsearch API Key
- OpenAI API Key
Note: You’ll need this because the demo uses the OpenAI provider, but Mastra supports other AI SDKs and community model providers, so you can easily swap it out depending on your setup.
Building a Mastra project
We’ll use Mastra’s built-in CLI to provide the scaffolding for our project. Run the command:
npm create mastra@latestYou’ll get a set of prompts, starting with:
1. Give your project a name.

2. We can keep this default; feel free to leave this blank.

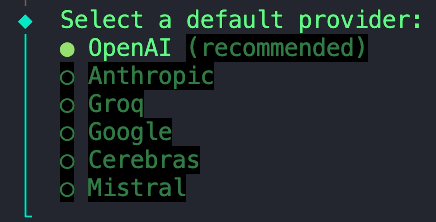
3. For this project, we’ll use a model provided by OpenAI.
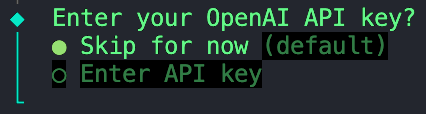
4. Select the “Skip for now” option as we’ll store all our environment variables in an `.env` file we’ll configure at a later step.
5. We can also skip this option.
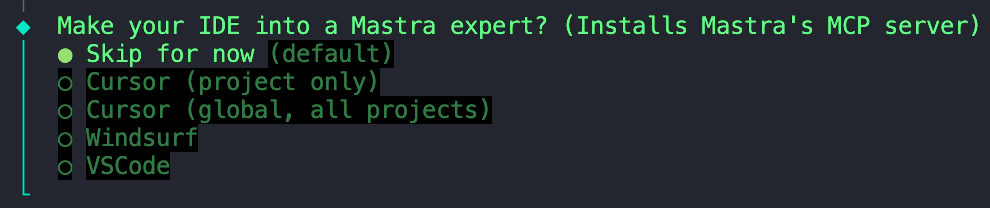
Skipping the installation of Mastra's MCP server
Once that’s finished initializing, we can move to the next step.
Installing dependencies
Next, we need to install a few dependencies:
npm install ai @ai-sdk/openai @elastic/elasticsearch dotenvai- Core AI SDK package that provides tools for managing AI models, prompts, and workflows in JavaScript/TypeScript. Mastra is built on top of the AI SDK by Vercel, so we need this dependency to enable model interactions with your agent.@ai-sdk/openai- Plugin that connects the AI SDK to OpenAI models (like GPT-4, GPT-4o, etc.), enabling API calls using your OpenAI API key.@elastic/elasticsearch- Official Elasticsearch client for Node.js, used to connect to your Elastic Cloud or local cluster for indexing, searching, and vector operations.dotenv- Loads environment variables from a .env file into process.env, allowing you to securely inject credentials like API keys and Elasticsearch endpoints.
Configuring environment variables
Create a .env file in your project root directory if you don’t already see one. Alternatively, you can copy and rename the example .env I provided in the repo. In this file, we can add the following variables:
ELASTICSEARCH_ENDPOINT="your-endpoint-here"
ELASTICSEARCH_API_KEY="your-key-here"
OPENAI_API_KEY="your-key-here"
That concludes the basic setup. From here, you can already start building and orchestrating agents. We’ll take it a step further and add Elasticsearch as the store and vector search layer.
Adding Elasticsearch as the vector store
Create a new folder called stores and inside, add this file. Before Mastra and Elastic ship an official Elasticsearch vector store integration, Abhi Aiyer(Mastra CTO) shared this early prototype class called ElasticVector. Simply, it connects Mastra’s memory abstraction to Elasticsearch’s dense vector capabilities, so developers can drop in Elasticsearch as the vector database for their agents.
Let’s take a deeper look at the important parts of the integration:
Ingestion of the Elasticsearch client
This section defines the ElasticVector class and sets up the Elasticsearch client connection with support for both standard and serverless deployments.
export interface ElasticVectorConfig extends ClientOptions {
    /**
     * Explicitly specify if connecting to Elasticsearch Serverless.
     * If not provided, will be auto-detected on first use.
     */
    isServerless?: boolean;

    /**
     * Maximum documents to count accurately when describing indices.
     * Higher values provide accurate counts but may impact performance on large indices.
     *
     * @default 10000
     */
    maxCountAccuracy?: number;
}

export class ElasticVector extends MastraVector {
    private client: Client;
    private isServerless: boolean | undefined;
    private deploymentChecked: boolean = false;
    private readonly maxCountAccuracy: number;

    constructor(config: ElasticVectorConfig) {
        super();
        this.client = new Client(config);
        this.isServerless = config.isServerless;
        this.maxCountAccuracy = config.maxCountAccuracy ?? 10000;
    }
}
ElasticVectorConfig extends ClientOptions: This creates a new configuration interface that inherits all Elasticsearch client options (likenode,auth,requestTimeout) and adds our custom properties. This means users can pass any valid Elasticsearch configuration along with our serverless-specific options.extends MastraVector: This allowsElasticVectorto inherit from Mastra’s baseMastraVectorclass, which is a common interface that all vector store integrations conform to. This ensures that Elasticsearch behaves like any other Mastra vector backend from the agent’s perspective.private client: Client: This is a private property that holds an instance of the Elasticsearch JavaScript client. This allows the class to talk directly to your cluster.isServerlessanddeploymentChecked: These properties work together to detect and cache whether we're connected to a serverless or standard Elasticsearch deployment. This detection happens automatically on first use, or can be explicitly configured.constructor(config: ClientOptions): This constructor takes a configuration object (containing your Elasticsearch credentials and optional serverless settings) and uses it to initialize the client in the linethis.client = new Client(config).super(): This calls Mastra’s base constructor, so it inherits logging, validation helpers and other internal hooks.
At this point, Mastra knows that there’s a new vector store called ElasticVector
Detecting deployment type
Before creating indices, the adapter automatically detects whether you're using standard Elasticsearch or Elasticsearch Serverless. This is important because serverless deployments don't allow manual shard configuration.
private async detectServerless(): Promise<boolean> {
    // Return cached result if already detected
    if (this.deploymentChecked) {
        return this.isServerless ?? false;
    }

    // Use explicit configuration if provided
    if (this.isServerless !== undefined) {
        this.deploymentChecked = true;
        this.logger?.info(
            `Using explicit deployment type: ${this.isServerless ? 'Serverless' : 'Standard'}`
        );
        return this.isServerless;
    }

    try {
        const info = await this.client.info();

        // Primary detection: build flavor (most reliable)
        const isBuildFlavorServerless = info.version?.build_flavor === 'serverless';

        // Secondary detection: tagline (fallback)
        const isTaglineServerless = info.tagline?.toLowerCase().includes('serverless') ?? false;

        this.isServerless = isBuildFlavorServerless || isTaglineServerless;
        this.deploymentChecked = true;

        this.logger?.info(
            `Auto-detected ${this.isServerless ? 'Serverless' : 'Standard'} Elasticsearch deployment`,
            {
                buildFlavor: info.version?.build_flavor,
                version: info.version?.number,
                detectionMethod: isBuildFlavorServerless ? 'build_flavor' : 'tagline'
            }
        );

        return this.isServerless;
    } catch (error) {
        this.logger?.warn(
            'Could not auto-detect deployment type, assuming Standard Elasticsearch. ' +
            'Set isServerless: true explicitly in config if using Serverless.',
            { error: error instanceof Error ? error.message : String(error) }
        );
        this.isServerless = false;
        this.deploymentChecked = true;
        return false;
    }
}
What’s happening:
- First checks if you explicitly set
isServerlessin the config (skips auto-detection) - Calls Elasticsearch's
info()API to get cluster information - Checks the
build_flavor field(serverless deployments returnserverless) - Falls back to checking the tagline if build flavor isn't available
- Caches the result to avoid repeated API calls
- Defaults to standard deployment if detection fails
Example usage:
// Option 1: Auto-detect (recommended)
const vector = new ElasticVector({
    node: 'https://your-cluster.es.cloud',
    auth: { apiKey: 'your-api-key' }
});
// Detection happens automatically on first index operation

// Option 2: Explicit configuration (faster startup)
const vector = new ElasticVector({
    node: 'https://your-serverless.es.cloud',
    auth: { apiKey: 'your-api-key' },
    isServerless: true  // Skips auto-detection
});
Creating the “memory” store in Elasticsearch
The function below sets up an Elasticsearch index for storing embeddings. It checks whether the index already exists. If not, it creates one with the mapping below that contains a dense_vector field to store embeddings and custom similarity metrics.
Some things to note:
- The
dimensionparameter is the length of each embedding vector, which depends on which embedding model you’re using. In our case, we’ll generate embeddings using OpenAI’stext-embedding-3-smallmodel, which outputs vectors of size1536. We’ll use this as our default value. - The
similarityvariable used in the mapping below is defined from the helper function const similarity = this.mapMetricToSimilarity(metric), which takes in the value for themetricparameter and converts it to an Elasticsearch-compatible keyword for the chosen distance metric.- For example: Mastra uses general terms for vector similarity like
cosine,euclidean, anddotproduct. If we were to pass the metriceuclideandirectly into the Elasticsearch mapping, it would throw an error because Elasticsearch expects the keywordl2_normto represent Euclidean distance.
- For example: Mastra uses general terms for vector similarity like
- Serverless compatibility: The code automatically omits shard and replica settings for serverless deployments, as these are managed automatically by Elasticsearch Serverless.
async createIndex(params: CreateIndexParams): Promise<void> {
    const { indexName, dimension = 1536, metric = 'cosine' } = params;

    try {
        const exists = await this.client.indices.exists({ index: indexName });

        if (exists) {
            try {
                await this.validateExistingIndex(indexName, dimension, metric);
                this.logger?.info(`Index "${indexName}" already exists and is valid`);
                return;
            } catch (validationError) {
                throw new Error(
                    `Index "${indexName}" exists but does not match the required configuration: ${
                        validationError instanceof Error ? validationError.message : String(validationError)
                    }`
                );
            }
        }

        const isServerless = await this.detectServerless();
        const similarity = this.mapMetricToSimilarity(metric);

        const indexConfig: any = {
            index: indexName,
            mappings: {
                properties: {
                    vector: {
                        type: 'dense_vector',
                        dims: dimension,
                        index: true,
                        similarity: similarity,
                    },
                    metadata: {
                        type: 'object',
                        enabled: true,
                        dynamic: true, // Allows flexible metadata structures
                    },
                },
            },
        };

        // Only configure shards/replicas for non-serverless deployments
        // Serverless manages infrastructure automatically
        if (!isServerless) {
            indexConfig.settings = {
                number_of_shards: 1,
                number_of_replicas: 0, // Increase for production HA deployments
            };
        }

        await this.client.indices.create(indexConfig);

        this.logger?.info(
            `Created ${isServerless ? 'Serverless' : 'Standard'} Elasticsearch index "${indexName}"`,
            { dimension, metric, similarity }
        );
    } catch (error) {
        const errorMessage = error instanceof Error ? error.message : String(error);
        this.logger?.error(`Failed to create index "${indexName}": ${errorMessage}`);
        throw new Error(`Failed to create index "${indexName}": ${errorMessage}`);
    }
}
Storing a new memory or note after an interaction
This function takes new embeddings generated after each interaction, along with the metadata, then inserts or updates them into the index using Elastic’s bulk API. The bulk API groups multiple write operations into a single request; this improvement in our indexing performance ensures that updates stay efficient as our agent’s memory keeps growing.
async upsert(params: UpsertVectorParams): Promise<string[]> {
    const { indexName, vectors, metadata = [], ids } = params;

    try {
        // Generate unique IDs if not provided
        const vectorIds = ids || vectors.map((_, i) =>
            `vec_${Date.now()}_${i}_${Math.random().toString(36).substr(2, 9)}`
        );

        const operations = vectors.flatMap((vec, index) => [
            { index: { _index: indexName, _id: vectorIds[index] } },
            {
                vector: vec,
                metadata: metadata[index] || {},
            },
        ]);

        const response = await this.client.bulk({
            refresh: true,
            operations,
        });

        if (response.errors) {
            const erroredItems = response.items.filter((item: any) => item.index?.error);
            const erroredIds = erroredItems.map((item: any) => item.index?._id);
            const errorDetails = erroredItems.slice(0, 3).map((item: any) => ({
                id: item.index?._id,
                error: item.index?.error?.reason || item.index?.error,
                type: item.index?.error?.type
            }));

            const errorMessage = `Failed to upsert ${erroredIds.length}/${vectors.length} vectors`;
            console.error(`${errorMessage}. Sample errors:`, JSON.stringify(errorDetails, null, 2));
            this.logger?.error(errorMessage, {
                failedCount: erroredIds.length,
                totalCount: vectors.length,
                sampleErrors: errorDetails
            });

            // Still return successfully inserted IDs
            const successfulIds = vectorIds.filter((id, idx) =>
                !erroredIds.includes(id)
            );

            if (successfulIds.length === 0) {
                throw new Error(`${errorMessage}. All operations failed. See logs for details.`);
            }

            return successfulIds;
        }

        this.logger?.info(`Successfully upserted ${vectors.length} vectors to "${indexName}"`);
        return vectorIds;
    } catch (error) {
        const errorMessage = error instanceof Error ? error.message : String(error);
        this.logger?.error(`Failed to upsert vectors to "${indexName}": ${errorMessage}`);
        throw new Error(`Failed to upsert vectors to "${indexName}": ${errorMessage}`);
    }
}
Querying similar vectors for semantic recall
This function is the core of the semantic recall feature. The agent uses vector search to find similar stored embeddings within our index.
async query(params: QueryVectorParams<any>): Promise<QueryResult[]> {
    const { indexName, queryVector, topK = 10, filter, includeVector = false } = params;

    try {
        const knnQuery: any = {
            field: 'vector',
            query_vector: queryVector,
            k: topK,
            num_candidates: Math.max(topK * 10, 100), // Search more candidates for better recall
        };

        // Apply metadata filters if provided
        if (filter) {
            knnQuery.filter = this.buildElasticFilter(filter);
        }

        const sourceFields = ['metadata'];
        if (includeVector) {
            sourceFields.push('vector');
        }

        const response = await this.client.search({
            index: indexName,
            knn: knnQuery,
            size: topK,
            _source: sourceFields,
        });

        const results = response.hits.hits.map((hit: any) => ({
            id: hit._id,
            score: hit._score || 0,
            metadata: hit._source?.metadata || {},
            vector: includeVector ? hit._source?.vector : undefined,
        }));

        this.logger?.debug(`Query returned ${results.length} results from "${indexName}"`);
        return results;
    } catch (error) {
        const errorMessage = error instanceof Error ? error.message : String(error);
        this.logger?.error(`Failed to query vectors from "${indexName}": ${errorMessage}`);
        throw new Error(`Failed to query vectors from "${indexName}": ${errorMessage}`);
    }
}
Under the hood:
- Runs a kNN (k-nearest neighbors) query using the
knnAPI in Elasticsearch. - Retrieves the top-K similar vectors to the input query vector.
- Optionally applies metadata filters to narrow down results (e.g., only search within a specific category or time range)
- Returns structured results including the document ID, similarity score, and the stored metadata.
Creating the knowledge agent
Now that we’ve seen the connection between Mastra and Elasticsearch through the ElasticVector integration, let’s create the Knowledge Agent itself.
Inside the folder agents, create a file called knowledge-agent.ts. We can start by connecting our environment variables and initializing the Elasticsearch client.
import { Agent } from '@mastra/core/agent';
import { Memory } from '@mastra/memory';
import { openai } from '@ai-sdk/openai';
import { Client } from '@elastic/elasticsearch';
import { ElasticVector } from '../stores/elastic-store';
import dotenv from "dotenv";

dotenv.config();

const ELASTICSEARCH_ENDPOINT = process.env.ELASTICSEARCH_ENDPOINT;
const ELASTICSEARCH_API_KEY = process.env.ELASTICSEARCH_API_KEY;

//Error check for undefined credentials
if (!ELASTICSEARCH_ENDPOINT || !ELASTICSEARCH_API_KEY) {
  throw new Error('Missing Elasticsearch credentials');
}

//Check to see if a connection can be established
const testClient = new Client({
  node: ELASTICSEARCH_ENDPOINT,
  auth: {
    apiKey: ELASTICSEARCH_API_KEY
  },
});

try {
  await testClient.ping();
  console.log('Connected to Elasticsearch successfully');
} catch (error: unknown) {
  if (error instanceof Error) {
    console.error('Failed to connect to Elasticsearch:', error.message);
  } else {
    console.error('Failed to connect to Elasticsearch:', error);
  }
  process.exit(1);
}
//Initialize the Elasticsearch vector store
const vectorStore = new ElasticVector({
  node: ELASTICSEARCH_ENDPOINT,
  auth: {
    apiKey: ELASTICSEARCH_API_KEY,
  },
//Optional: Explicitly set to true if using Elasticsearch Serverless to skip auto-detection and improve startup time
//isServerless: true,
});
Here, we:
- Use
dotenvto load in our variables from our.envfile. - Check whether the Elasticsearch credentials are being injected correctly, and we can establish a successful connection to the client.
- Pass in the Elasticsearch endpoint and API key into the
ElasticVectorconstructor to create an instance of our vector store that we defined earlier. - Optionally specify
isServerless: trueif you're using Elasticsearch Serverless. This skips the auto-detection step and improves startup time. If omitted, the adapter will automatically detect your deployment type on first use.
Next, we can define the agent using Mastra’s Agent class.
export const knowledgeAgent = new Agent({
    name: 'KnowledgeAgent',
    instructions: 'You are a helpful knowledge assistant.',
    model: openai('gpt-4o'),
    memory: new Memory({

        vector: vectorStore,

        //embedder used to create embeddings for each message
        embedder: 'openai/text-embedding-3-small',

        //set semantic recall options
        options: {
            semanticRecall: {
                topK: 3, // retrieve 3 similar messages
                messageRange: 2, // include 2 messages before/after each match
                scope: 'resource',
            },
        },
    }),
});
The fields we can define are:
nameandinstructions: Give it an identity and primary function.model: We are using OpenAI’sgpt-4othrough the@ai-sdk/openaipackage.memory:vector: Points to our Elasticsearch store, so embeddings get stored and retrieved from there.embedder: Which model to use for generating embeddingssemanticRecalloptions decide how the recall works:topK: How many semantically similar messages to retrieve.messageRange: How much of the conversation to include with each match.scope: Defines the boundary for memory.
Almost done. We just need to add this newly created agent to our Mastra configuration. In the file called index.ts, import the knowledge agent and insert it into the agents field.
export const mastra = new Mastra({
  agents: { knowledgeAgent },
  storage: new LibSQLStore({
    // stores observability, scores, ... into memory storage, if it needs to persist, change to file:../mastra.db
    url: ":memory:",
  }),
  logger: new PinoLogger({
    name: 'Mastra',
    level: 'info',
  }),
  telemetry: {
    // Telemetry is deprecated and will be removed in the Nov 4th release
    enabled: false,
  },
  observability: {
    // Enables DefaultExporter and CloudExporter for AI tracing
    default: { enabled: true },
  },
});
The other fields include:
storage: This is Mastra’s internal data store for run history, observability metrics, scores, and caches. For more information on Mastra storage, visit here.logger: Mastra uses Pino, which is a lightweight structured JSON logger. It captures events like agent start and stops, tool calls and results, errors, and LLM response times.observability: Controls AI tracing and execution visibility for agents. It tracks:- Start/end of each reasoning step.
- Which model or tool was used.
- Inputs and outputs.
- Scores and evaluations
Testing the agent with Mastra Studio
Congrats! If you’ve made it here, you are ready to run this agent and test out its semantic recall abilities. Fortunately, Mastra provides a built-in chat UI so we don't have to build our own.
To start the Mastra dev server, open up a terminal and run the following command:
npm run devAfter the initial bundling and start-up of the server, it should provide you with an address for the Playground.

Paste this address into your browser, and you’ll be greeted with the Mastra Studio.
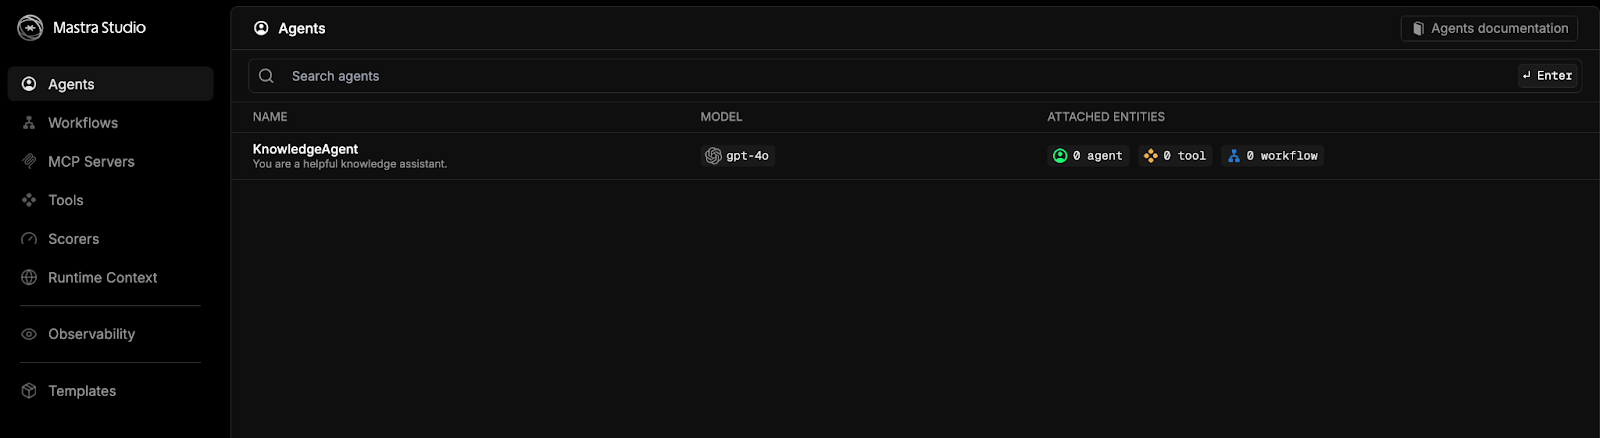
Select the option for knowledgeAgent and chat away.
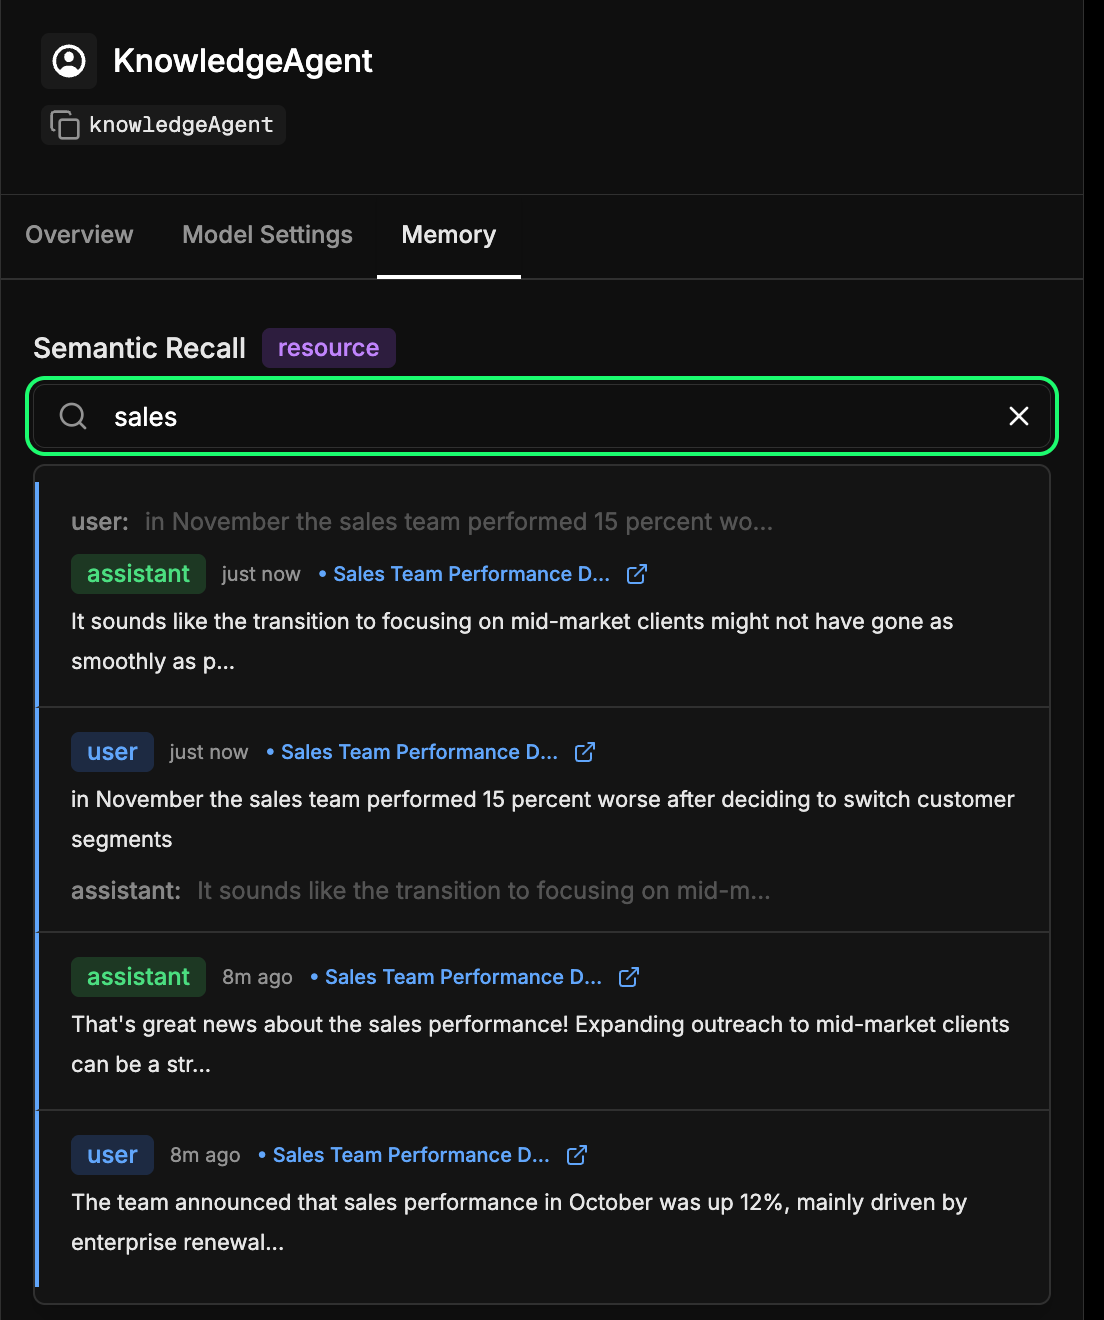
For a quick test to see if everything is wired correctly, give it some information like, “The team announced that sales performance in October was up 12%, mainly driven by enterprise renewals. The next step is to expand outreach to mid-market clients.” Next, start a new chat and ask a question like, “Which customer segment did we say we need to focus on next?” The knowledge agent should be able to recall the information you gave it from the first chat. You should see a response like:

Seeing a response like this means the agent successfully stored our previous message as embeddings in Elasticsearch and retrieved it later using vector search.
Inspecting the agent’s long-term memory store
Head over to the memory tab in your agent’s configuration in the Mastra Studio. This lets you see what your agent has learned over time. Every message, response, and interaction that gets embedded and stored in Elasticsearch becomes part of this long-term memory. You can semantically search through past interactions to quickly find recalled information or context that the agent learned earlier. This is essentially the same mechanism the agent uses during semantic recall, but here you can inspect it directly. In our example below, we’re searching for the term “sales” and getting back every interaction that included something about sales.
Conclusion
By connecting Mastra and Elasticsearch, we can give our agents memory, which is a key layer in context engineering. With semantic recall, agents can build context over time, grounding their responses in what they’ve learned. That means more accurate, reliable, and natural interactions.
This early integration is just the starting point. The same pattern here can enable support agents that remember past tickets, internal bots that retrieve relevant documentation, or AI assistants that can recall customer details mid-conversation. We’re also working towards an official Mastra integration, making this pairing even more seamless in the near future.
We’re excited to see what you build next. Give it a try, explore Mastra and its memory features, and feel free to share what you discover with the community.
Ready to try this out on your own? Start a free trial.
Want to get Elastic certified? Find out when the next Elasticsearch Engineer training is running!
Related content
March 10, 2026
SearchClaw: Bring Elasticsearch to OpenClaw with composable skills
Give your local AI agent access to Elasticsearch data using OpenClaw, composable skills, and agents, no custom code required.

March 6, 2026
Build task-aware agents with an expanded model catalog on Elastic Inference Service (EIS)
Elastic Inference Service (EIS) expands its managed model catalog, enabling teams to build production-ready agents with flexible model choice across retrieval, generation, and reasoning, without managing GPUs or infrastructure.
March 9, 2026
Building effective database retrieval tools for context engineering
Best practices for writing database retrieval tools for context engineering. Learn how to design and evaluate agent tools for interacting with Elasticsearch data.

March 5, 2026
Does MCP make search obsolete? Not even close
Explore why search engines and indexed search remain the foundation for scalable, accurate, enterprise-grade AI, even in the age of MCP, federated search, and large context windows.
March 3, 2026
Using subagents and Elastic Agent Builder to bring business context into code planning
Learn about subagents, how to ensure they have the right information, and how to create a specialized subagent that connects Claude Code to your Elasticsearch data.