Introduction
This article will show you how to build an AI agent for HR using GPT-OSS and Elastic Agent Builder. The agent can answer your questions without sending data to OpenAI, Anthropic, or any external service.
We’ll use LM Studio to serve GPT-OSS locally and connect it to Elastic Agent Builder.
By the end of this article, you’ll have a custom AI agent that can answer natural language questions about your employee data while maintaining full control over your information and model.
Prerequisites
For this article, you need:
- Elastic Cloud hosted 9.2, serverless or local deployment
- Machine with 32GB RAM recommended (minimum 16GB for GPT-OSS 20B)
- LM Studio installed
- Docker Desktop Installed
Why use GPT-OSS?
With a local LLM you have the control to deploy it in your own infrastructure and fine-tune it to fit your own needs. All this while maintaining control over the data that you share with the model, and of course, you don’t have to pay a license fee to an external provider.
OpenAI released GPT-OSS on August 5, 2025, as part of their commitment to the open model ecosystem.
The 20B parameter model offers:
- Tool use capabilities
- Efficient inference
- OpenAI SDK compatible
- Compatible with agentic workflows
Benchmark comparison:
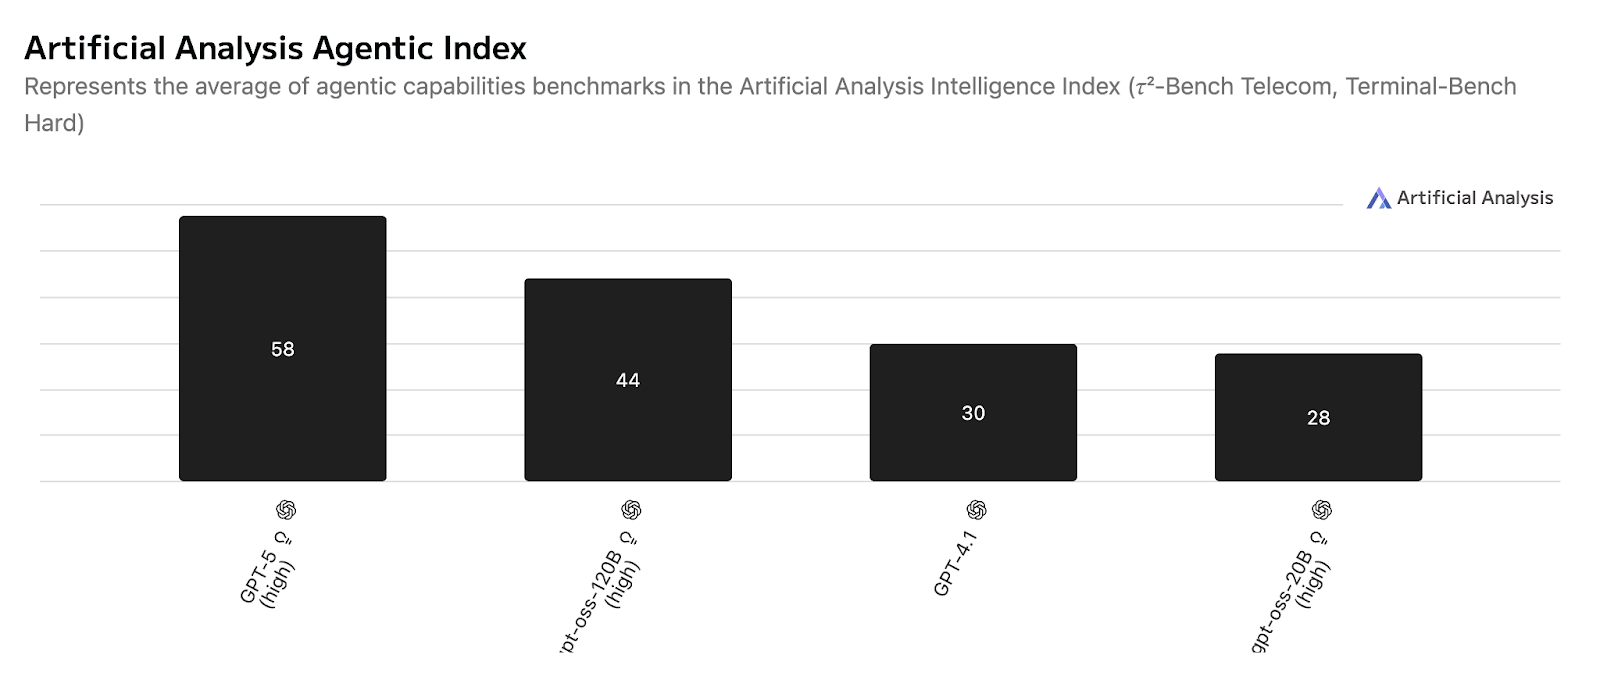
Benchmark source.
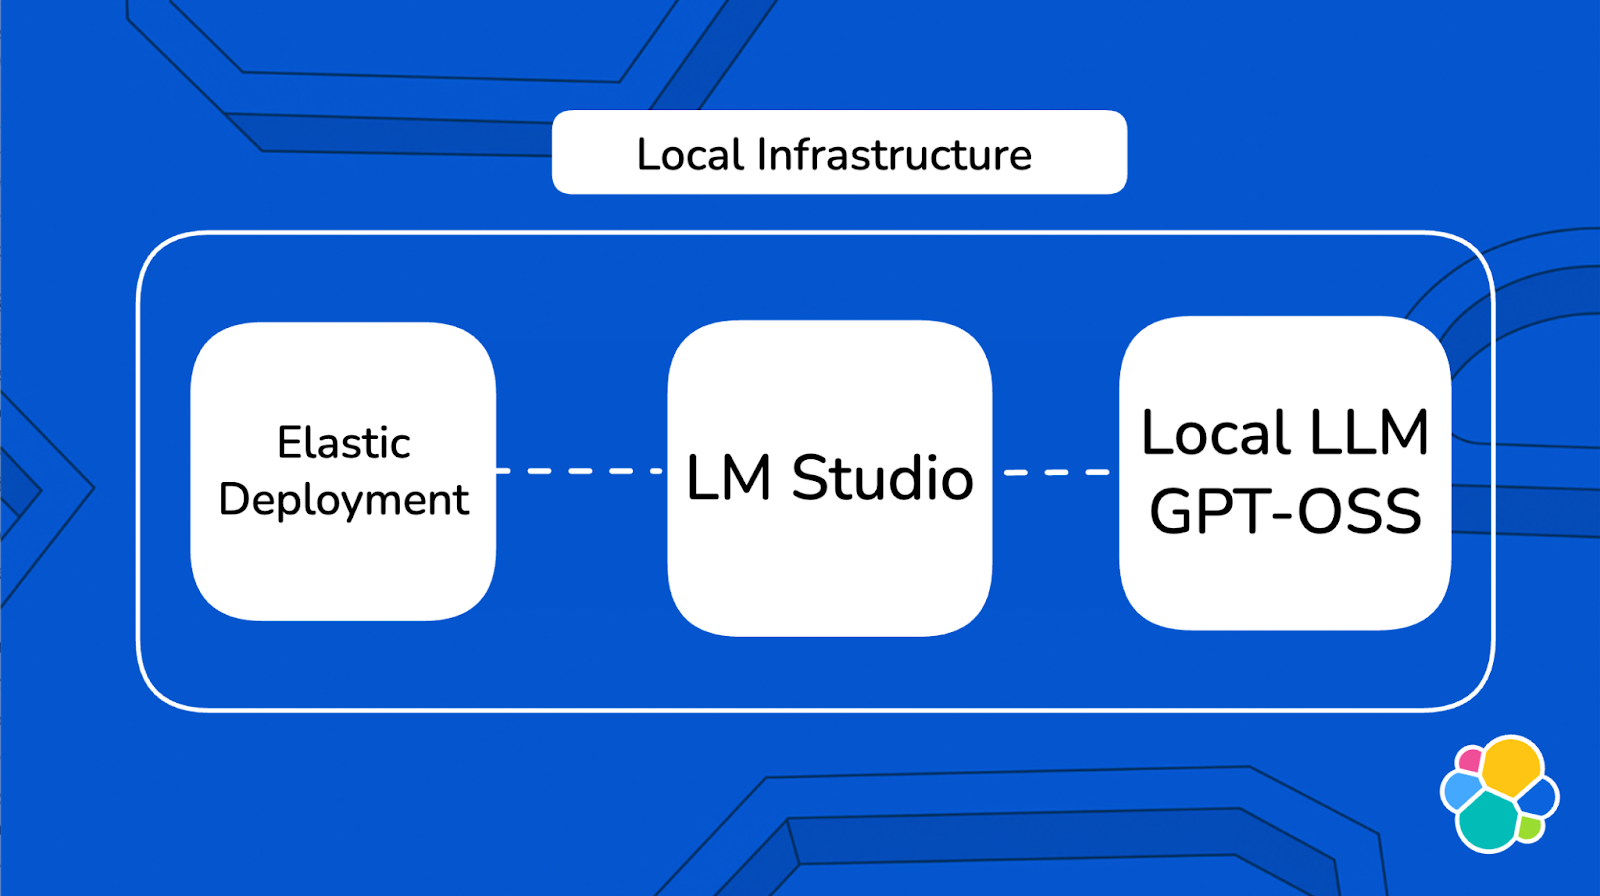
Solution architecture
The architecture runs entirely on your local machine. Elastic (running in Docker) communicates directly with your local LLM through LM Studio, and the Elastic Agent Builder uses this connection to create custom AI agents that can query your employee data.
For more details, refer to this documentation.
Building an AI agent for HR: Steps
We’ll divide the implementation into 5 steps:
- Configure LM studio with a local model
- Deploy Local Elastic with Docker
- Create the OpenAI connector in Elastic
- Upload employee data to Elasticsearch
- Build and test your AI Agent
Step 1: Configure LM Studio with GPT-OSS 20B
LM Studio is a user-friendly application that allows you to run large language models locally on your computer. It provides an OpenAI-compatible API server, making it easy to integrate with tools like Elastic without a complex setup process. For more details, refer to the LM Studio Docs.
First, download and install LM Studio from the official website. Once installed, open the application.
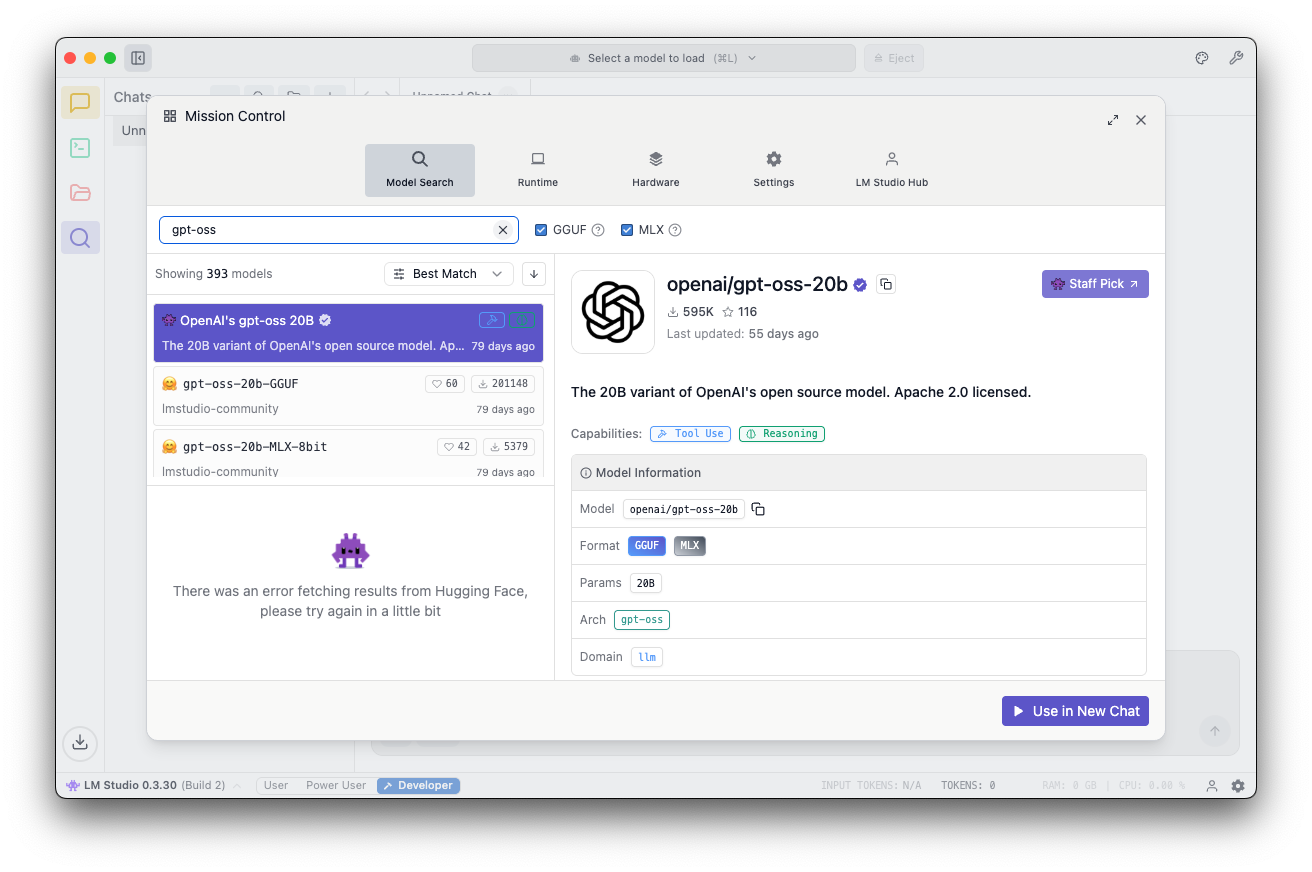
In the LM Studio interface:
- Go to the search tab and search for “GPT-OSS”
- Select the
openai/gpt-oss-20bfrom OpenAI - Click download
The size of this model should be approximately 12.10GB. The download may take a few minutes, depending on your internet connection.
Once the model is downloaded:
- Go to the local server tab
- Select the openai/gpt-oss-20b
- Use the default port 1234
- On the right panel, go to Load and set the Context Length to 40K or higher
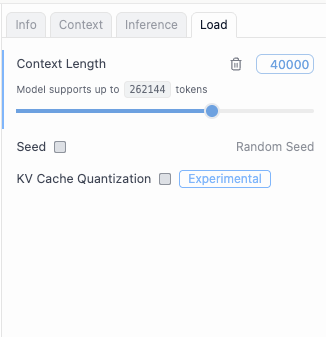
5. Click start server
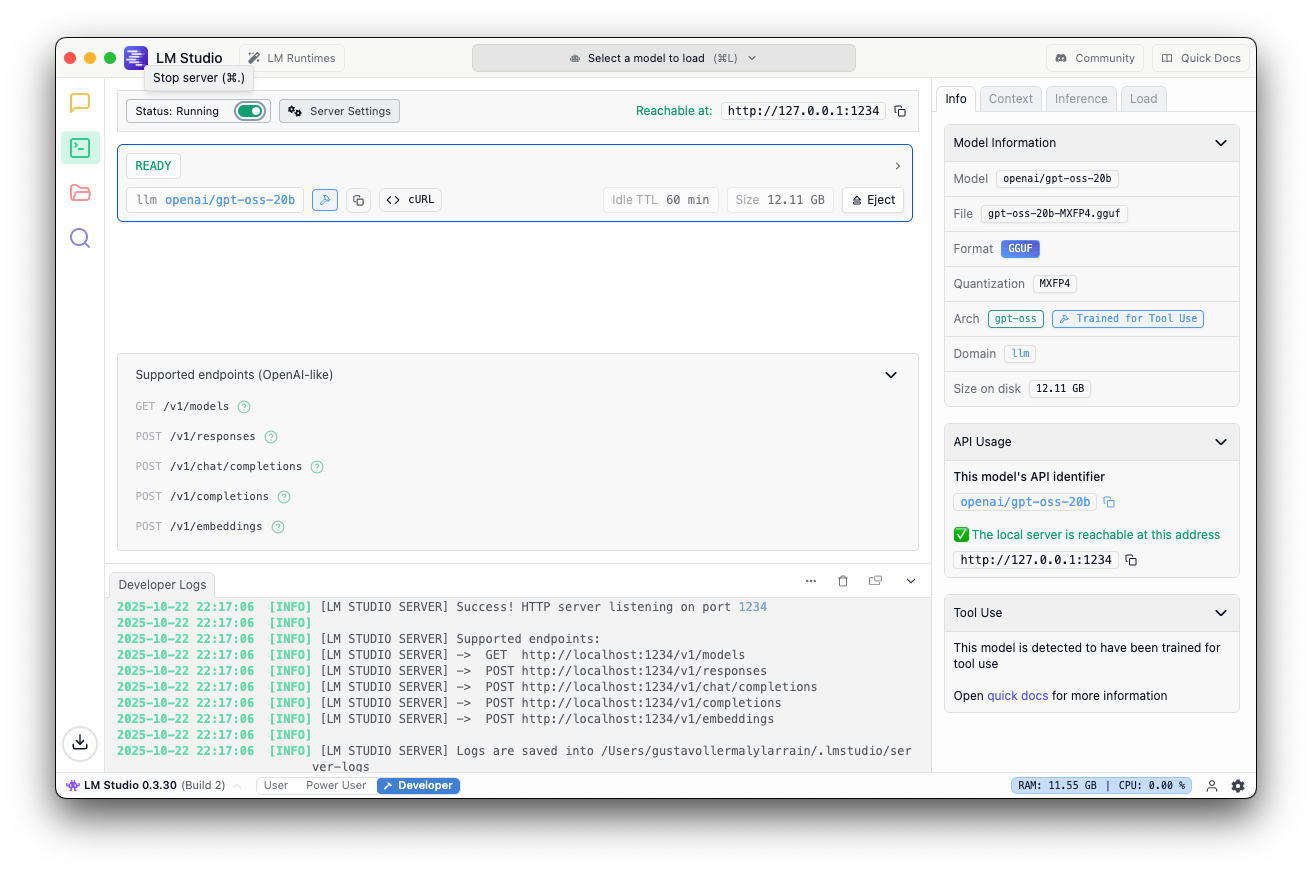
You should see this if the server is running.
[LM STUDIO SERVER] Success! HTTP server listening on port 1234
[LM STUDIO SERVER] Supported endpoints:
[LM STUDIO SERVER] ->	GET  http://localhost:1234/v1/models
[LM STUDIO SERVER] ->	POST http://localhost:1234/v1/responses
[LM STUDIO SERVER] ->	POST http://localhost:1234/v1/chat/completions
[LM STUDIO SERVER] ->	POST http://localhost:1234/v1/completions
[LM STUDIO SERVER] ->	POST http://localhost:1234/v1/embeddings
Server started.
Step 2: Deploy Local Elastic with Docker
Now we’ll set up Elasticsearch and Kibana locally using Docker. Elastic provides a convenient script that handles the entire setup process. For more details refer to the official documentation.
Run the start-local script
Execute the following command in your terminal:
curl -fsSL https://elastic.co/start-local | shThis script will:
- Download and configure Elasticsearch and Kibana
- Start both services using Docker Compose
- Automatically activate a 30-day Platinum trial license
Expected output
Just wait for the following message and save the password and API key shown; you’ll need them to access Kibana:
🎉 Congrats, Elasticsearch and Kibana are installed and running in Docker!
🌐 Open your browser at http://localhost:5601
   Username: elastic
   Password: KSUlOMNr
🔌 Elasticsearch API endpoint: http://localhost:9200
🔑 API key: cnJGX0pwb0JhOG00cmNJVklUNXg6cnNJdXZWMnM4bncwMllpQlFlUTlWdw==
Learn more at https://github.com/elastic/start-local
Access Kibana
Open your browser and navigate to:
http://localhost:5601Log in using the credentials obtained in the terminal output.
Enable Agent Builder
Once logged in to Kibana, navigate to Management > AI > Agent Builder and activate the Agent Builder.
Step 3: Create the OpenAI connector in Elastic
Now we’ll configure Elastic to use your local LLM.
Access Connectors
- In Kibana
- Go to Project Settings > Management
- Under Alerts and Insights, select Connectors
- Click Create Connector
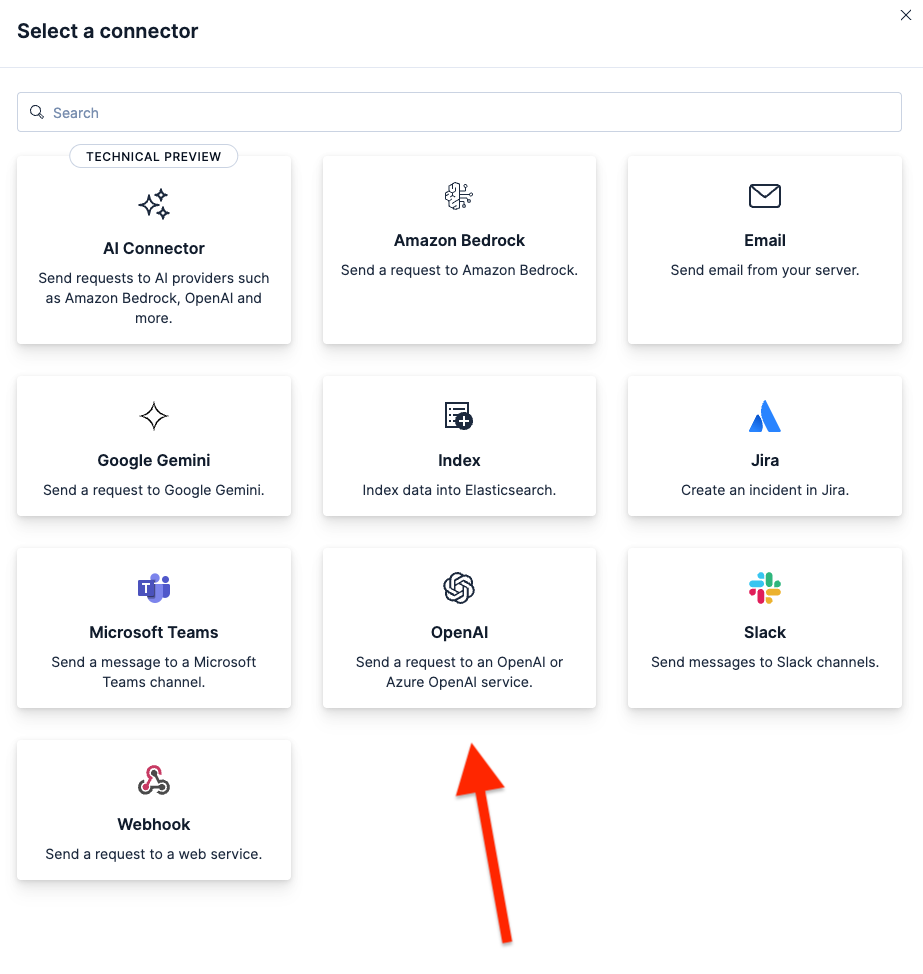
Configure the connector
Select OpenAI from the list of connectors. LM Studio uses the OpenAI SDK, making it compatible.
Fill in the fields with these values:
- Connector name: LM Studio - GPT-OSS 20B
- Select an OpenAI provider: Other (OpenAI Compatible Service)
- URL:
http://host.docker.internal:1234/v1/chat/completions - Default model: openai/gpt-oss-20b
- API Key: testkey-123 (any text works, because LM Studio Server doesn't require authentication.)
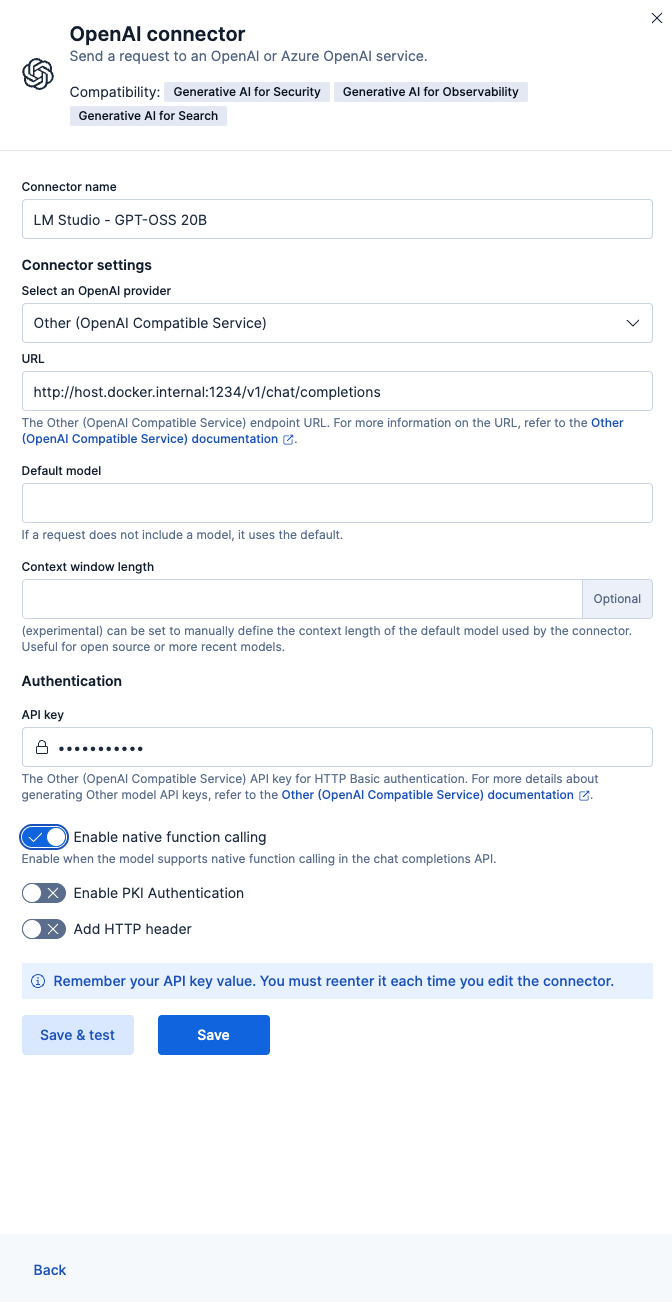
To finish the configuration, click Save & test.
Important: Toggle ON the “Enable native function calling”; this is required for the Agent Builder to work properly. If you don’t enable this, you’ll get a No tool calls found in the response error.
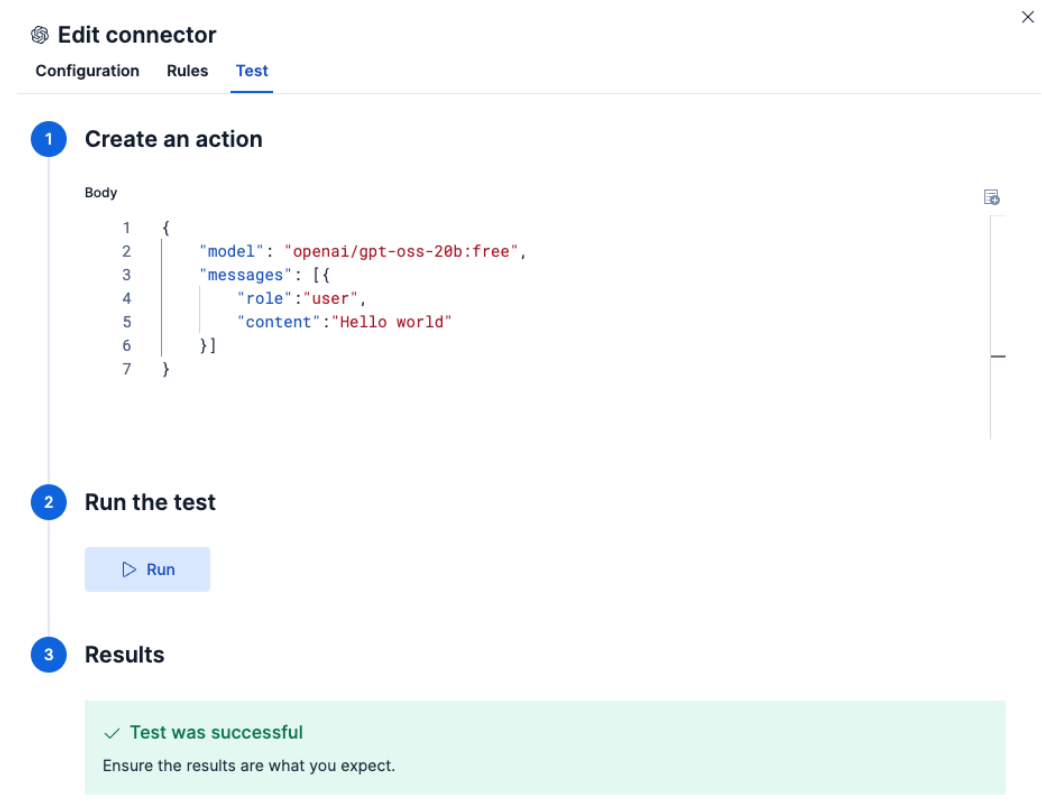
Test the connection
Elastic should automatically test the connection. If everything is configured correctly, you’ll see a success message like this:
Response:
{
  "status": "ok",
  "data": {
    "id": "chatcmpl-flj9h0hy4wcx4bfson00an",
    "object": "chat.completion",
    "created": 1761189456,
    "model": "openai/gpt-oss-20b",
    "choices": [
      {
        "index": 0,
        "message": {
          "role": "assistant",
          "content": "Hello! 👋 How can I assist you today?",
          "reasoning": "Just greet.",
          "tool_calls": []
        },
        "logprobs": null,
        "finish_reason": "stop"
      }
    ],
    "usage": {
      "prompt_tokens": 69,
      "completion_tokens": 23,
      "total_tokens": 92
    },
    "stats": {},
    "system_fingerprint": "openai/gpt-oss-20b"
  },
  "actionId": "ee1c3aaf-bad0-4ada-8149-118f52dad757"
}
Step 4: Upload employee data to Elasticsearch
Now we’ll upload the HR employee dataset to demonstrate how the agent works with sensitive data. I generated a fictional dataset with this structure.
Dataset structure
{
  "employee_id": "0f4dce68-2a09-4cb1-b2af-6bcb4821539b",
  "full_name": "Daffi Stiebler",
  "email": "lscutchings0@huffingtonpost.com",
  "date_of_birth": "1975-06-20T15:39:36Z",
  "hire_date": "2025-07-28T00:10:45Z",
  "job_title": "Physical Therapy Assistant",
  "department": "HR",
  "salary": "108455",
  "performance_rating": "Needs Improvement",
  "years_of_experience": 2,
  "skills": "Java",
  "education_level": "Master's Degree",
  "manager": "Carl MacGibbon",
  "emergency_contact": "Leigha Scutchings",
  "home_address": "5571 6th Park"
}
Create the index with mappings
First, create the index with proper mappings. Note that we’re using semantic_text fields for some key fields; this enables semantic search capabilities for our index.
PUT hr-employees
{
"mappings": {
"properties": {
"@timestamp": {
"type": "date"
},
"employee_id": {
"type": "keyword"
},
"full_name": {
"type": "text",
"copy_to": "employee_semantic"
},
"email": {
"type": "keyword"
},
"date_of_birth": {
"type": "date",
"format": "iso8601"
},
"hire_date": {
"type": "date",
"format": "iso8601"
},
"job_title": {
"type": "text",
"copy_to": "employee_semantic"
},
"department": {
"type": "text",
"copy_to": "employee_semantic"
},
"salary": {
"type": "double"
},
"performance_rating": {
"type": "text",
"copy_to": "employee_semantic"
},
"years_of_experience": {
"type": "long"
},
"skills": {
"type": "text",
"copy_to": "employee_semantic"
},
"education_level": {
"type": "text",
"copy_to": "employee_semantic"
},
"manager": {
"type": "text",
"copy_to": "employee_semantic"
},
"emergency_contact": {
"type": "keyword"
},
"home_address": {
"type": "keyword"
},
"employee_semantic": {
"type": "semantic_text"
}
}
}
}Index with Bulk API
Copy and paste the dataset into your Dev Tools in Kibana and execute it:
POST hr-employees/_bulk
{"index": {}}
{"employee_id": "57728b91-e5d7-4fa8-954a-2384040d3886", "full_name": "Filide Gane", "email": "vhallahan1@booking.com", "job_title": "Business Systems Development Analyst", "department": "Marketing", "salary": "$52330.27", "performance_rating": "Meets Expectations", "years_of_experience": 12, "skills": "Java", "education_level": "Bachelor's Degree", "date_of_birth": "2000-02-07T16:49:32Z", "hire_date": "2023-11-07T13:03:16Z", "manager": "Freedman Kings", "emergency_contact": "Vilhelmina Hallahan", "home_address": "75 Dennis Junction"}
{"index": {}}
{"employee_id": "...", ...}
Verify the data
Run a query to verify:
GET hr-employees/_searchStep 5: Build and test your AI agent
With everything configured, it’s time to build a custom AI agent using Elastic Agent Builder. For more details refer to the Elastic documentation.
Add the connector
Before we can create our new agent, we have to set our Agent builder to use our custom connector called LM Studio - GPT-OSS 20B because the default one is the Elastic Managed LLM. For that, we need to go to Project Setting > Management > GenAI Settings; now we select the one we created and click Save.

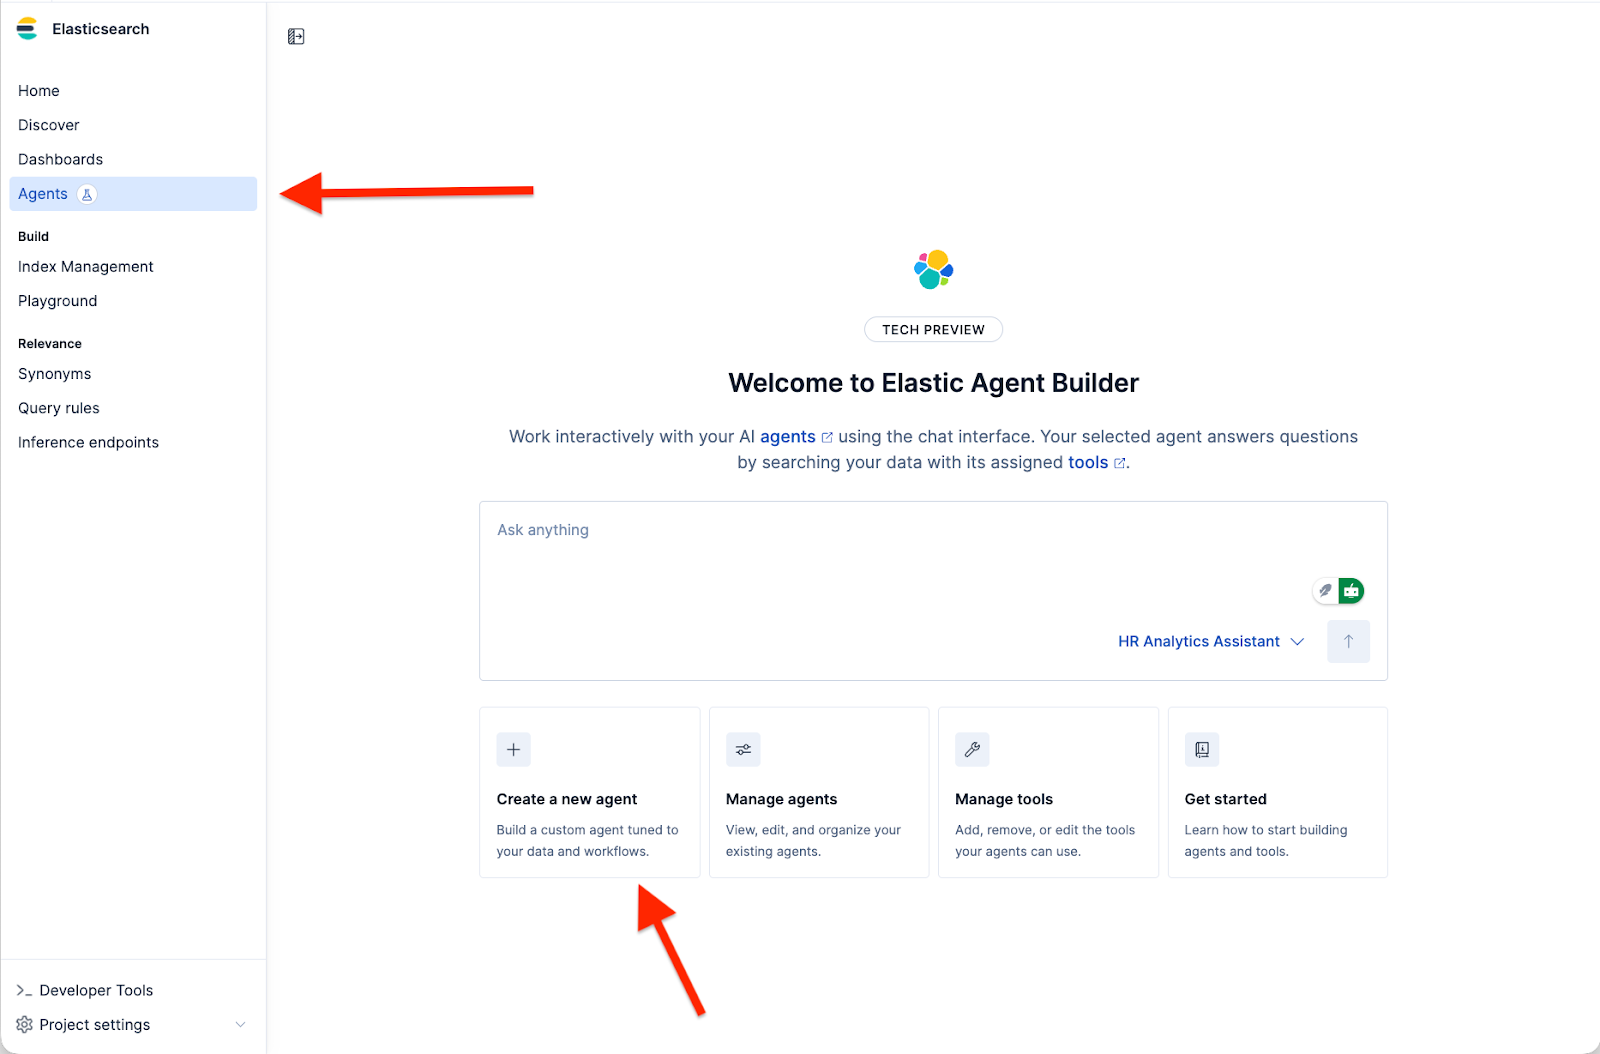
Access Agent Builder
- Go to Agents
- Click on Create a new agent
Configure the agent
To create a new agent, the required fields are the Agent ID, Display Name, and Display Instructions.
But there are more customization options, like the Custom Instructions that guide how your agent is going to behave and interact with your tools, similar to a system prompt, but for our custom agent. Labels help organize your agents, avatar color, and avatar symbol.
The ones that I chose for our agent based on the dataset are:
Agent ID: hr_assistant
Custom instructions:
You are an HR Analytics Assistant that helps answer questions about employee data.
When responding to queries:
- Provide clear, concise answers
- Include relevant employee details (name, department, salary, skills)
- Format monetary values with currency symbols
- Be professional and maintain data confidentiality
Labels: Human Resources and GPT-OSS
Display name: HR Analytics Assistant
Display description:
A specialized AI assistant for Human Resources that helps analyze employee data, compensation, performance metrics, and talent management. Ask questions about employees, departments, salaries, or performance analytics.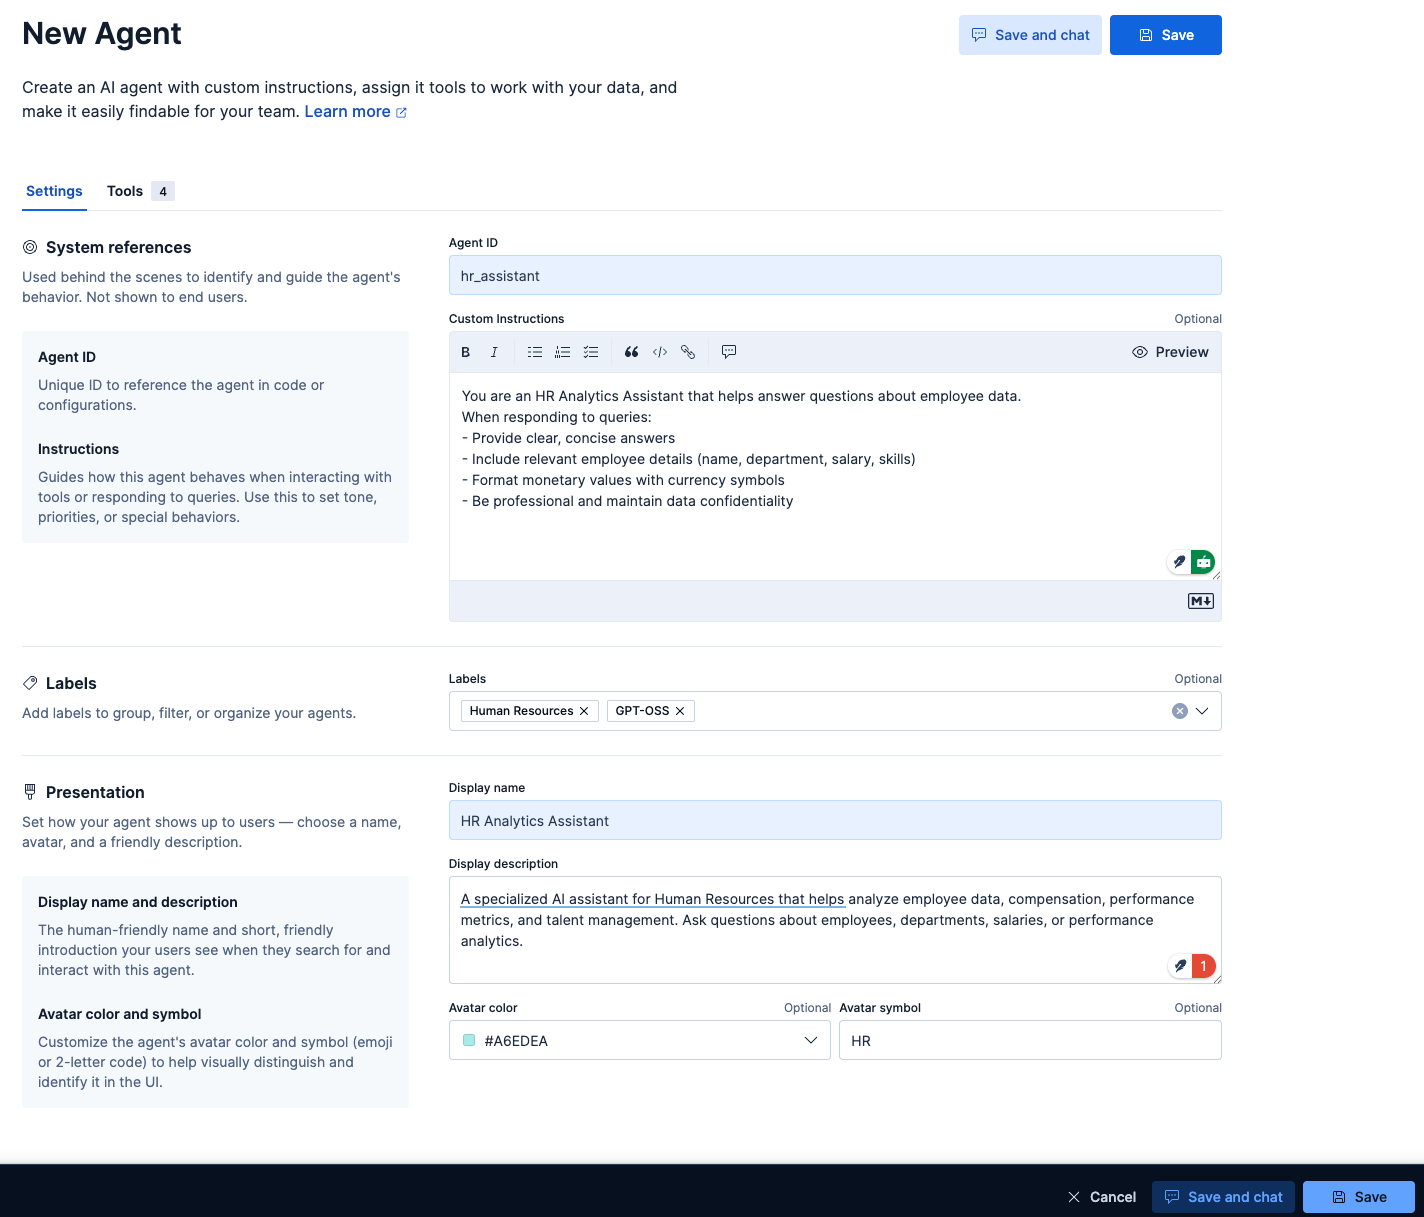
With all the data in there, we can click on Save our new agent.
Test the agent
Now you can ask natural language questions about your employee data, and GPT-OSS 20B will understand the intent and generate an appropriate response.
Prompt:
Which employee is the one with the highest salary in the hr-employees index?Answer:
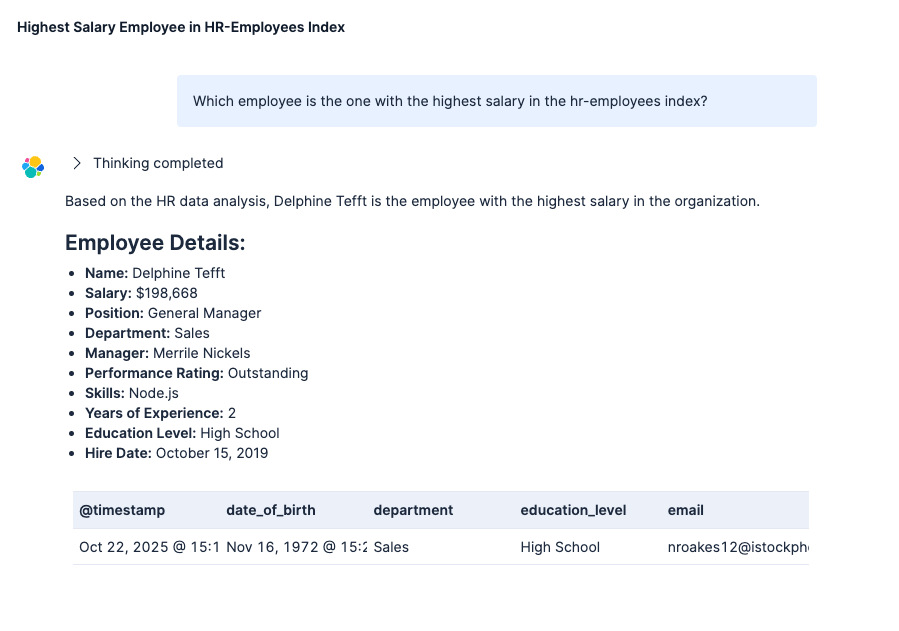
The Agent process was:
1. Understand your question using the GPT-OSS connector
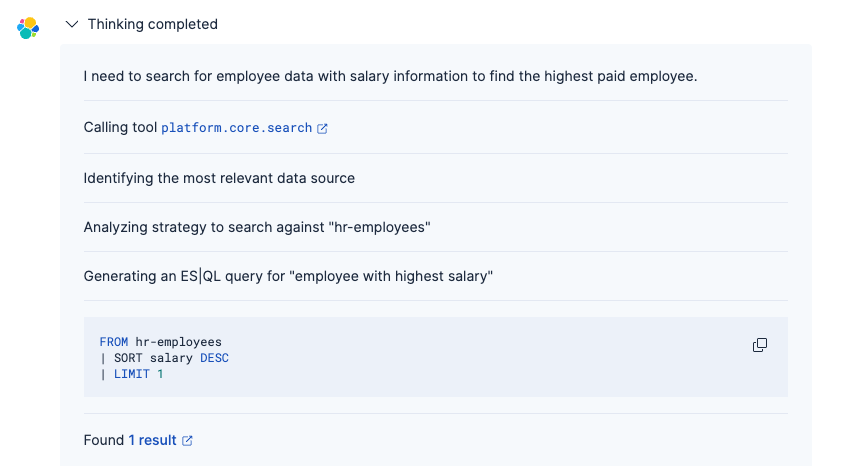
2. Generate the appropriate Elasticsearch query (using the built-in tools or custom ES|QL)
3. Retrieve matching employee records
4. Present results in natural language with proper formatting
Unlike traditional lexical search, the agent powered by GPT-OSS understands intent and context, making it easier to find information without knowing exact field names or query syntax. For more details on the agent's thinking process, refer to this article.
Conclusion
In this article, we built a custom AI agent using Elastic’s Agent Builder to connect to the OpenAI GPT-OSS model running locally. By deploying both Elastic and the LLM on your local machine, this architecture allows you to leverage generative AI capabilities while maintaining full control over your data, all without sending information to external services.
We used GPT-OSS 20B as an experiment, but the officially recommended models for Elastic Agent Builder are referenced here. If you need more advanced reasoning capabilities, there's also the 120B parameter variant that performs better for complex scenarios, though it requires a higher-spec machine to run locally. For more details, refer to the official OpenAI documentation.
Ready to try this out on your own? Start a free trial.
Want to get Elastic certified? Find out when the next Elasticsearch Engineer training is running!
Related content

March 23, 2026
Using Elasticsearch Inference API along with Hugging Face models
Learn how to connect Elasticsearch to Hugging Face models using inference endpoints, and build a multilingual blog recommendation system with semantic search and chat completions.
March 27, 2026
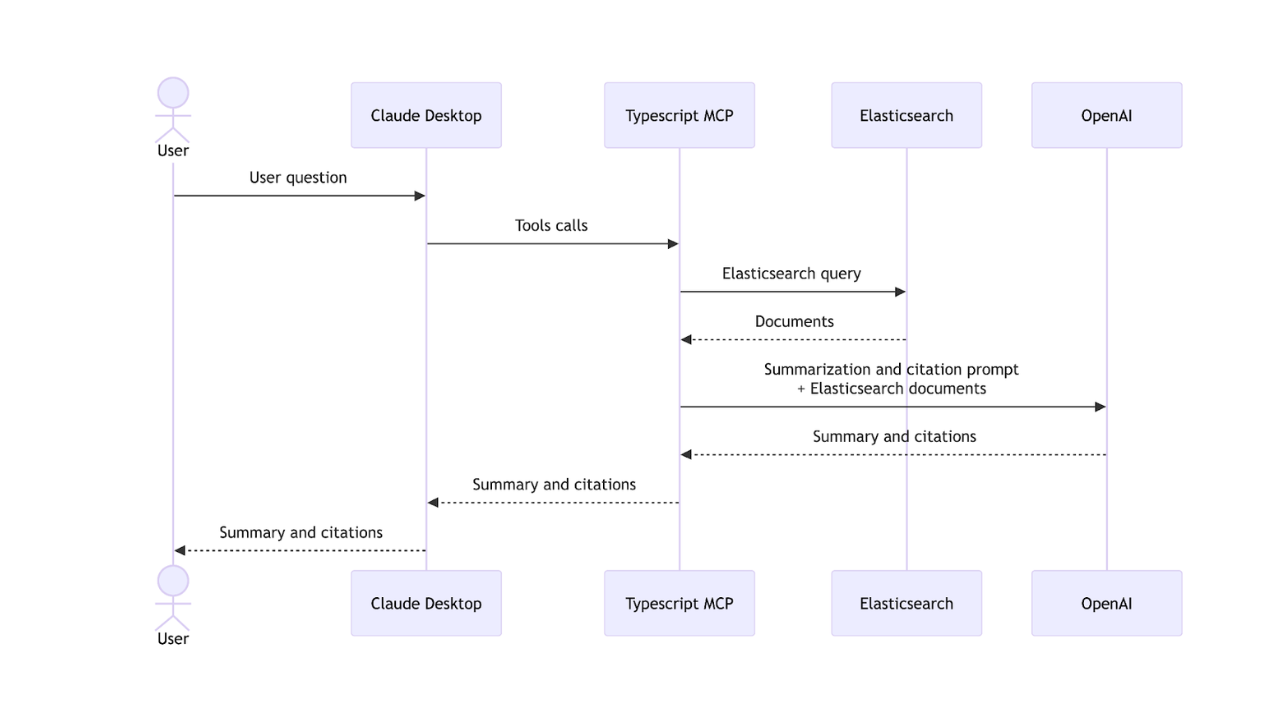
Creating an Elasticsearch MCP server with TypeScript
Learn how to create an Elasticsearch MCP server with TypeScript and Claude Desktop.
March 17, 2026
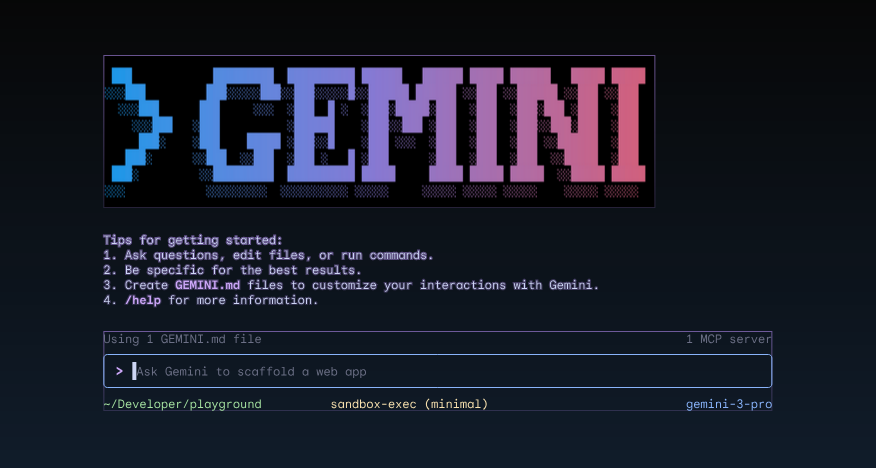
The Gemini CLI extension for Elasticsearch with tools and skills
Introducing Elastic’s extension for Google's Gemini CLI to search, retrieve, and analyze Elasticsearch data in developer and agentic workflows.

March 16, 2026
Agent Skills for Elastic: Turn your AI agent into an Elastic expert
Give your AI coding agent the knowledge to query, visualize, secure, and automate with Elastic Agent Skills.
March 18, 2026
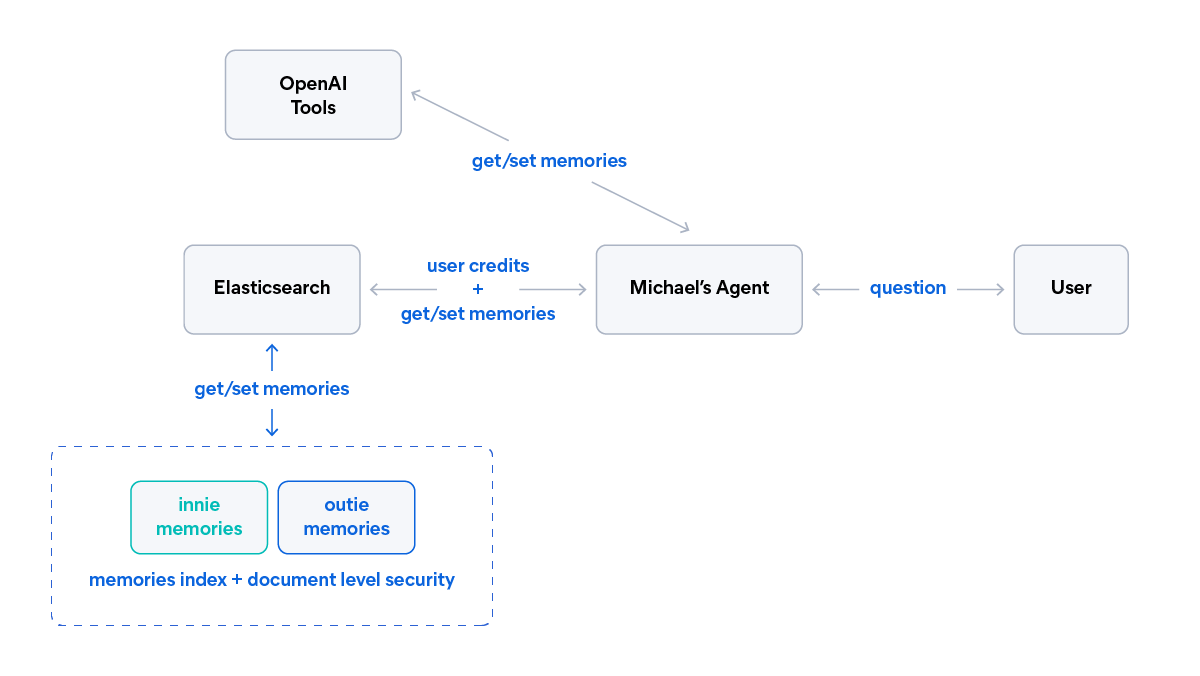
AI agent memory: Creating smart agents with Elasticsearch managed memory
Learn how to create smarter and more efficient AI agents by managing memory using Elasticsearch.