When working with large knowledge bases in Elasticsearch, finding information is only half the battle. Engineers often need to synthesize results from multiple documents, generate summaries, and trace answers back to their sources. Model Context Protocol (MCP) provides a standardized way to connect Elasticsearch with large language model–powered (LLM-powered) applications to accomplish this. While Elastic offers official solutions, like Elastic Agent Builder (which includes an MCP endpoint among its features), building a custom MCP server gives you full control over search logic, result formatting, and how retrieved content is passed to an LLM for synthesis, summaries, and citations.
In this article, we’ll explore the benefits of building a custom Elasticsearch MCP server and show how to create one in TypeScript that connects Elasticsearch to LLM-powered applications.
Why build a custom Elasticsearch MCP server?
Elastic provides some alternatives for MCP servers:
- Elastic Agent Builder MCP server for Elasticsearch 9.2+
- Elasticsearch MCP server for older versions (Python)
If you need more control over how your MCP server interacts with Elasticsearch, building your own custom server gives you the flexibility to tailor it exactly to your needs. For example, Agent Builder's MCP endpoint is limited to Elasticsearch Query Language (ES|QL) queries, while a custom server allows you to use the full Query DSL. You also gain control over how results are formatted before being passed to the LLM and can integrate additional processing steps, like the OpenAI-powered summarization we'll implement in this tutorial.
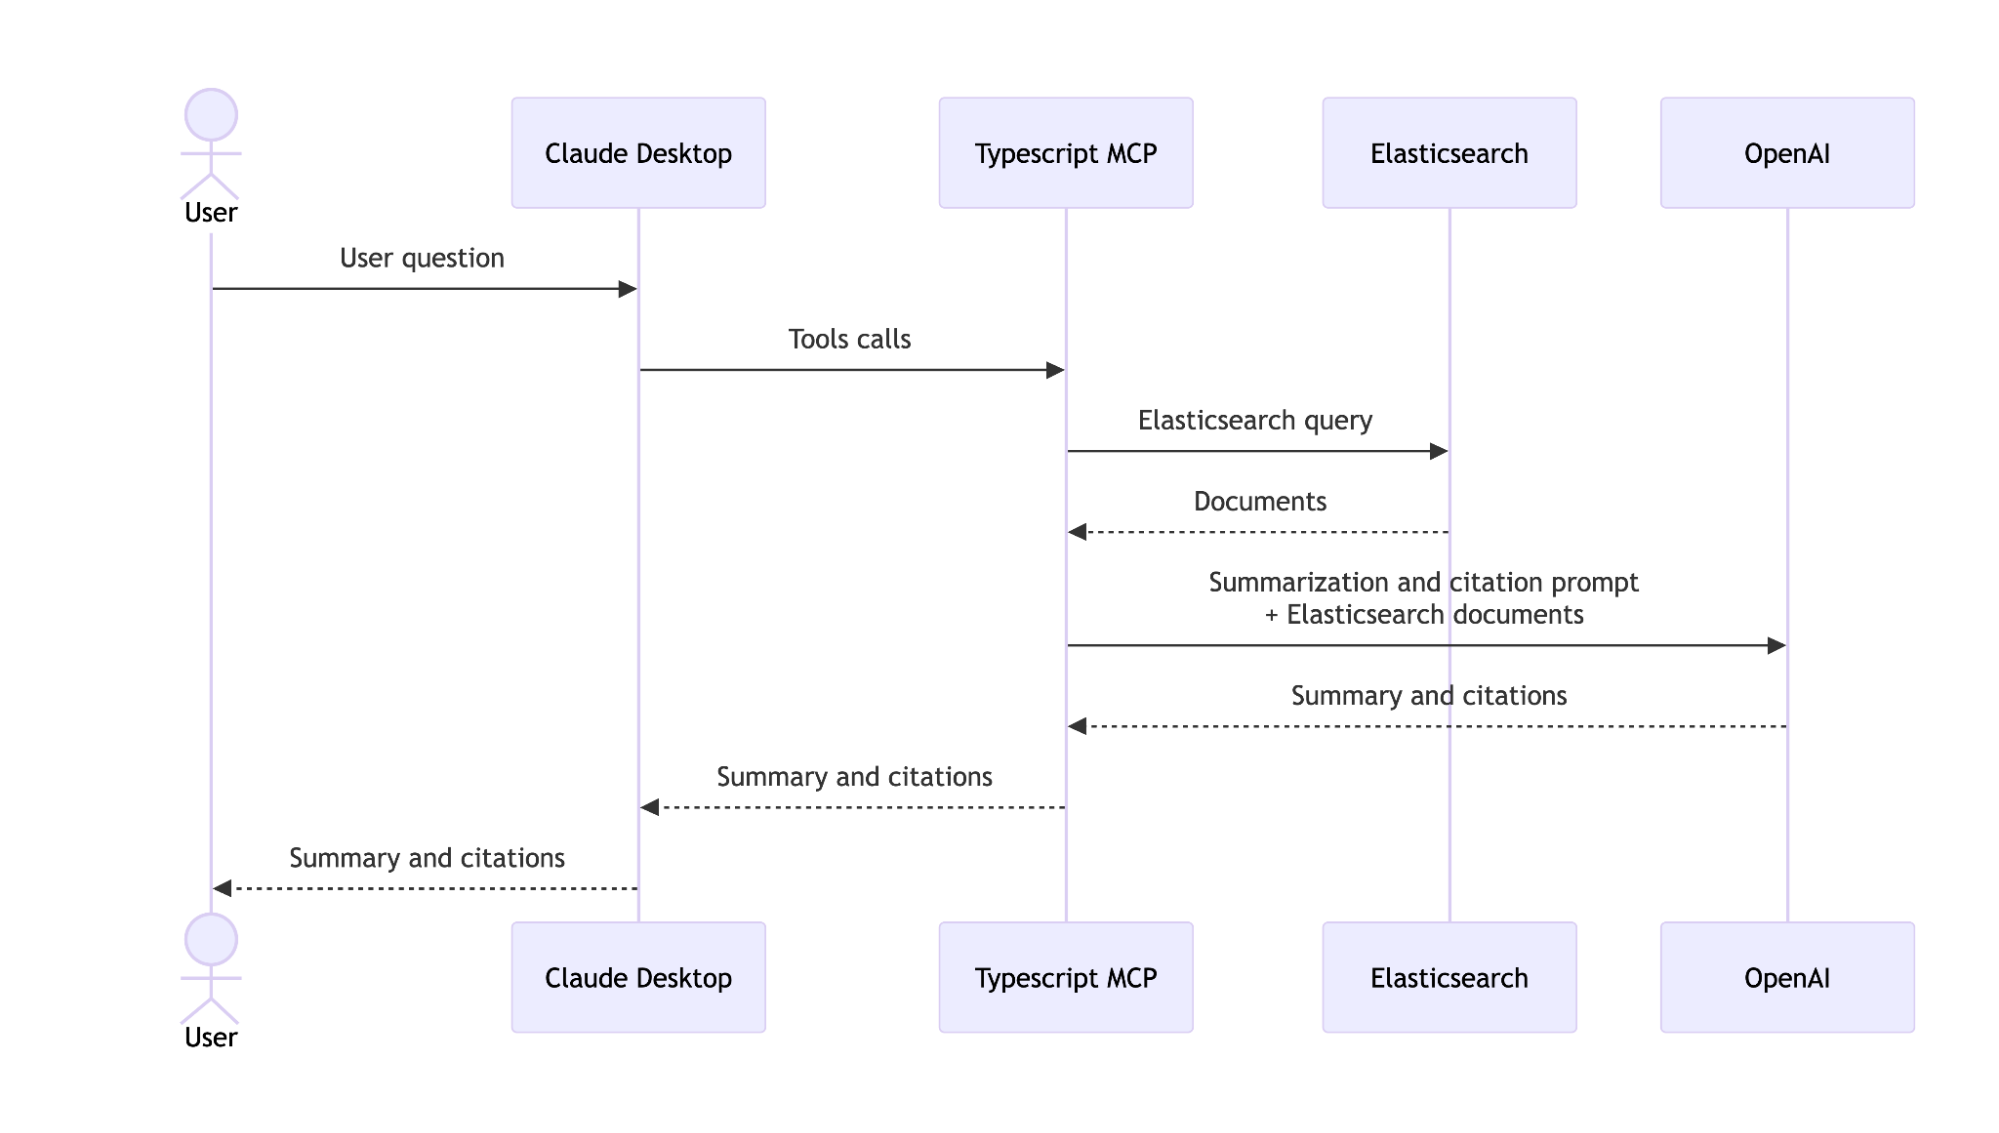
By the end of this article, you’ll have an MCP server in TypeScript that searches for information stored in an Elasticsearch index, summarizes it, and provides citations. We'll use Elasticsearch for retrieval, OpenAI's gpt-4o-mini model to summarize and generate citations, and Claude Desktop as the MCP client and UI to take in user queries and give responses. The end result is an internal knowledge assistant that helps engineers discover and synthesize best practices across their organization’s technical docs.
Prerequisites:
- Node.js 20 +
- Elasticsearch
- OpenAI API key
- Claude Desktop
What is MCP?
MCP is an open standard, created by Anthropic, that provides secure, bidirectional connections between LLMs and external systems, like Elasticsearch. You can read more about the current state of MCP in this article.
The MCP landscape is evolving every day, with servers available for a wide range of use cases. On top of that, it’s easy to build your own custom MCP server, as we’ll show in this article.
MCP clients
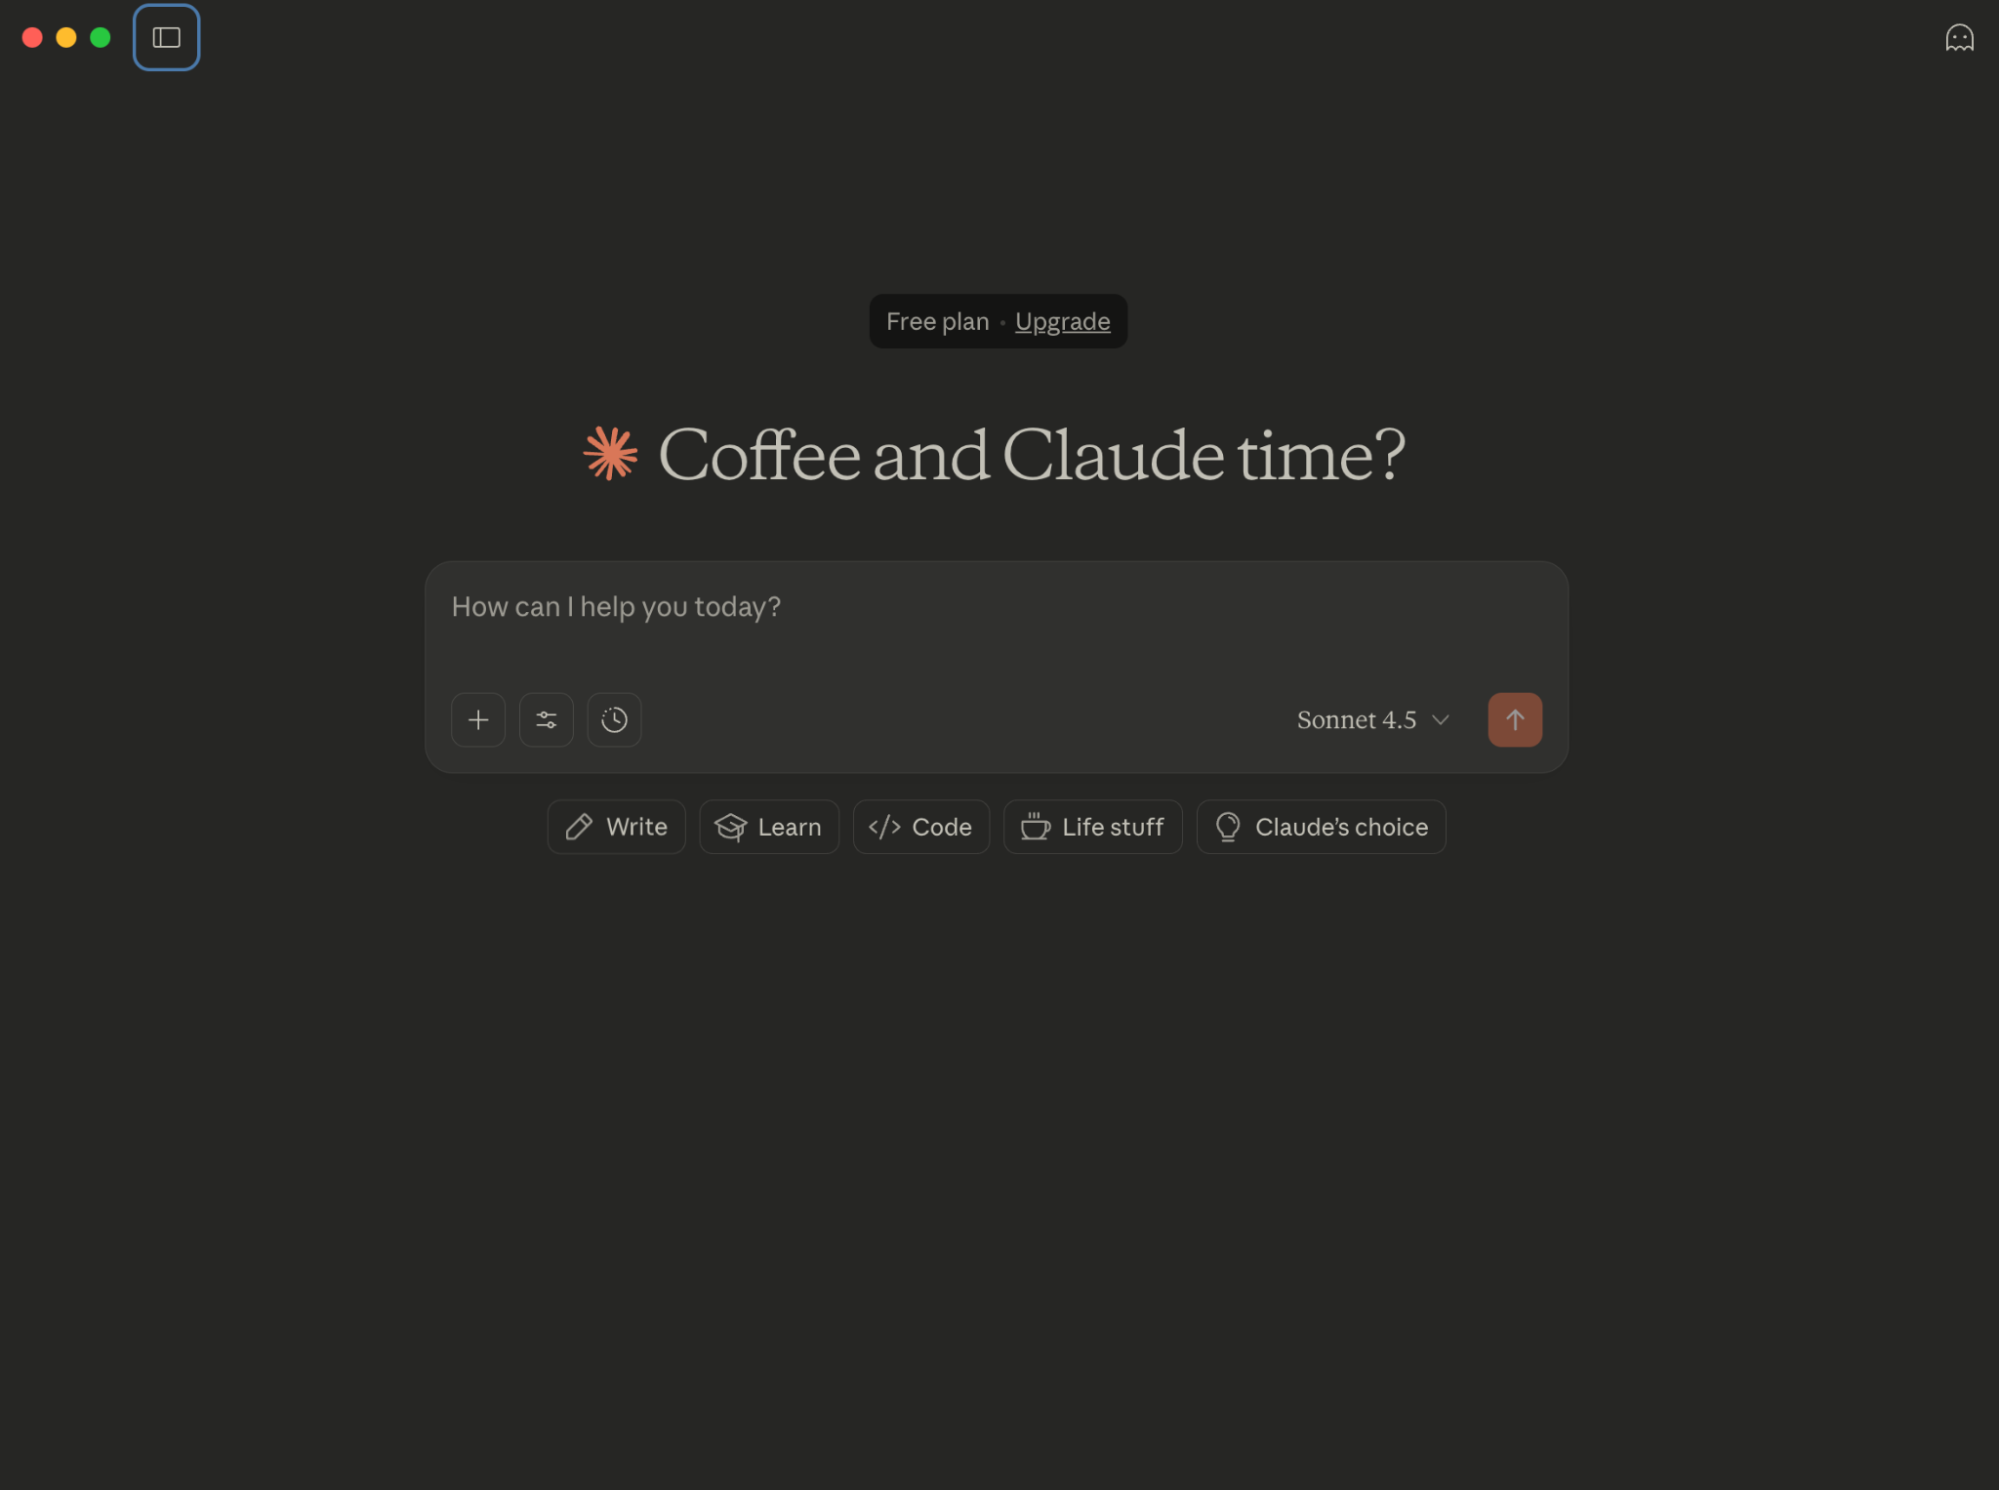
There’s a long list of available MCP clients, each with its own characteristics and limitations. For simplicity and popularity, we’ll use Claude Desktop as our MCP client. It will serve as the chat interface where users can ask questions in natural language, and it will automatically invoke the tools exposed by our MCP server to search documents and generate summaries.
Creating an Elasticsearch MCP server
Using the TypeScript SDK, we can easily create a server that understands how to query our Elasticsearch data based on a user query input.
Here are the steps in this article to integrate the Elasticsearch MCP server with the Claude Desktop client:
Configure MCP server for Elasticsearch
To begin, let's initialize a node application:
npm init -yThis will create a package.json file, and with it, we can start installing the necessary dependencies for this application.
npm install @elastic/elasticsearch @modelcontextprotocol/sdk openai zod && npm install --save-dev ts-node @types/node typescript- @elastic/elasticsearch will give us access to the Elasticsearch Node.js library.
- @modelcontextprotocol/sdk provides the core tools to create and manage an MCP server, register tools, and handle communication with MCP clients.
- openai allows interaction with OpenAI models to generate summaries or natural language responses.
- zod helps define and validate structured schemas for input and output data in each tool.
ts-node, @types/node, and typescript will be used during development to type the code and compile the scripts.
Set up the dataset
To provide the data that Claude Desktop can query using our MCP server, we’ll use a mock internal knowledge base dataset. Here’s what a document from this dataset will look like:
{
    "id": 5,
    "title": "Logging Standards for Microservices",
    "content": "Consistent logging across microservices helps with debugging and tracing. Use structured JSON logs and include request IDs and timestamps. Avoid logging sensitive information. Centralize logs in Elasticsearch or a similar system. Configure log rotation to prevent storage issues and ensure logs are searchable for at least 30 days.",
    "tags": ["logging", "microservices", "standards"]
}
To ingest the data, we prepared a script that creates an index in Elasticsearch and loads the dataset into it. You can find it here.
MCP server
Create a file named index.ts and add the following code to import the dependencies and handle environment variables:
// index.ts
import { z } from "zod";
import { Client } from "@elastic/elasticsearch";
import { McpServer } from "@modelcontextprotocol/sdk/server/mcp.js";
import { StdioServerTransport } from "@modelcontextprotocol/sdk/server/stdio.js";
import OpenAI from "openai";

const ELASTICSEARCH_ENDPOINT =
  process.env.ELASTICSEARCH_ENDPOINT ?? "http://localhost:9200";
const ELASTICSEARCH_API_KEY = process.env.ELASTICSEARCH_API_KEY ?? "";
const OPENAI_API_KEY = process.env.OPENAI_API_KEY ?? "";
const INDEX = "documents";
Also, let’s initialize the clients to handle the Elasticsearch and OpenAI calls:
const openai = new OpenAI({
  apiKey: OPENAI_API_KEY,
});

const _client = new Client({
  node: ELASTICSEARCH_ENDPOINT,
  auth: {
    apiKey: ELASTICSEARCH_API_KEY,
  },
});
To make our implementation more robust and ensure structured input and output, we'll define schemas using zod. This allows us to validate data at runtime, catch errors early, and make the tool responses easier to process programmatically:
const DocumentSchema = z.object({
  id: z.number(),
  title: z.string(),
  content: z.string(),
  tags: z.array(z.string()),
});

const SearchResultSchema = z.object({
  id: z.number(),
  title: z.string(),
  content: z.string(),
  tags: z.array(z.string()),
  score: z.number(),
});

type Document = z.infer<typeof DocumentSchema>;
type SearchResult = z.infer<typeof SearchResultSchema>;
Learn more about structured outputs here.
Now let’s initialize the MCP server:
const server = new McpServer({
  name: "Elasticsearch RAG MCP",
  description:
    "A RAG server using Elasticsearch. Provides tools for document search, result summarization, and source citation.",
  version: "1.0.0",
});
Defining the MCP tools
With everything configured, we can start writing the tools that will be exposed by our MCP server. This server exposes two tools:
search_docs: Searches for documents in Elasticsearch using full-text search.summarize_and_cite: Summarizes and synthesizes information from previously retrieved documents to answer a user question. This tool also adds citations referencing the source documents.
Together, these tools form a simple “retrieve-then-summarize” workflow, where one tool fetches relevant documents and the other uses those documents to generate a summarized, cited response.
Tool response format
Each tool can accept arbitrary input parameters, but it must respond with the following structure:
- Content: This is the response of the tool in an unstructured format. This field is usually used to return text, images, audio, links, or embeddings. For this application, it will be used to return formatted text with the information generated by the tools.
- structuredContent: This is an optional return used to provide the results of each tool in a structured format. This is useful for programmatic purposes. Although it isn't used in this MCP server, it can be useful if you want to develop other tools or process the results programmatically.
With that structure in mind, let’s dive into each tool in detail.
Search_docs tool
This tool performs a full-text search in the Elasticsearch index to retrieve the most relevant documents based on the user query. It highlights key matches and provides a quick overview with relevance scores.
server.registerTool(
  "search_docs",
  {
    title: "Search Documents",
    description:
      "Search for documents in Elasticsearch using full-text search. Returns the most relevant documents with their content, title, tags, and relevance score.",
    inputSchema: {
      query: z
        .string()
        .describe("The search query terms to find relevant documents"),
      max_results: z
        .number()
        .optional()
        .default(5)
        .describe("Maximum number of results to return"),
    },
    outputSchema: {
      results: z.array(SearchResultSchema),
      total: z.number(),
    },
  },
  async ({ query, max_results }) => {
    if (!query) {
      return {
        content: [
          {
            type: "text",
            text: "Query parameter is required",
          },
        ],
        isError: true,
      };
    }

    try {
      const response = await _client.search({
        index: INDEX,
        size: max_results,
        query: {
          bool: {
            must: [
              {
                multi_match: {
                  query: query,
                  fields: ["title^2", "content", "tags"],
                  fuzziness: "AUTO",
                },
              },
            ],
            should: [
              {
                match_phrase: {
                  title: {
                    query: query,
                    boost: 2,
                  },
                },
              },
            ],
          },
        },
        highlight: {
          fields: {
            title: {},
            content: {},
          },
        },
      });

      const results: SearchResult[] = response.hits.hits.map((hit: any) => {
        const source = hit._source as Document;

        return {
          id: source.id,
          title: source.title,
          content: source.content,
          tags: source.tags,
          score: hit._score ?? 0,
        };
      });

      const contentText = results
        .map(
          (r, i) =>
            `[${i + 1}] ${r.title} (score: ${r.score.toFixed(
              2,
            )})\n${r.content.substring(0, 200)}...`,
        )
        .join("\n\n");

      const totalHits =
        typeof response.hits.total === "number"
          ? response.hits.total
          : (response.hits.total?.value ?? 0);

      return {
        content: [
          {
            type: "text",
            text: `Found ${results.length} relevant documents:\n\n${contentText}`,
          },
        ],
        structuredContent: {
          results: results,
          total: totalHits,
        },
      };
    } catch (error: any) {
      console.log("Error during search:", error);

      return {
        content: [
          {
            type: "text",
            text: `Error searching documents: ${error.message}`,
          },
        ],
        isError: true,
      };
    }
  }
);
We configure fuzziness: “AUTO” to have a variable typo tolerance based on the length of the token that’s being analyzed. We also set title^2 to increase the score of the documents where the match happens on the title field.
summarize_and_cite tool
This tool generates a summary based on documents retrieved in the previous search. It uses OpenAI’s gpt-4o-mini model to synthesize the most relevant information to answer the user’s question, providing responses derived directly from the search results. In addition to the summary, it also returns citation metadata for the source documents used.
server.registerTool(
  "summarize_and_cite",
  {
    title: "Summarize and Cite",
    description:
      "Summarize the provided search results to answer a question and return citation metadata for the sources used.",
    inputSchema: {
      results: z
        .array(SearchResultSchema)
        .describe("Array of search results from search_docs"),
      question: z.string().describe("The question to answer"),
      max_length: z
        .number()
        .optional()
        .default(500)
        .describe("Maximum length of the summary in characters"),
      max_docs: z
        .number()
        .optional()
        .default(5)
        .describe("Maximum number of documents to include in the context"),
    },
    outputSchema: {
      summary: z.string(),
      sources_used: z.number(),
      citations: z.array(
        z.object({
          id: z.number(),
          title: z.string(),
          tags: z.array(z.string()),
          relevance_score: z.number(),
        })
      ),
    },
  },
  async ({ results, question, max_length, max_docs }) => {
    if (!results || results.length === 0 || !question) {
      return {
        content: [
          {
            type: "text",
            text: "Both results and question parameters are required, and results must not be empty",
          },
        ],
        isError: true,
      };
    }

    try {
      const used = results.slice(0, max_docs);

      const context = used
        .map(
          (r: SearchResult, i: number) =>
            `[Document ${i + 1}: ${r.title}]\\n${r.content}`
        )
        .join("\n\n---\n\n");

      // Generate summary with OpenAI
      const completion = await openai.chat.completions.create({
        model: "gpt-4o-mini",
        messages: [
          {
            role: "system",
            content:
              "You are a helpful assistant that answers questions based on provided documents. Synthesize information from the documents to answer the user's question accurately and concisely. If the documents don't contain relevant information, say so.",
          },
          {
            role: "user",
            content: `Question: ${question}\\n\\nRelevant Documents:\\n${context}`,
          },
        ],
        max_tokens: Math.min(Math.ceil(max_length / 4), 1000),
        temperature: 0.3,
      });

      const summaryText =
        completion.choices[0]?.message?.content ?? "No summary generated.";

      const citations = used.map((r: SearchResult) => ({
        id: r.id,
        title: r.title,
        tags: r.tags,
        relevance_score: r.score,
      }));

      const citationText = citations
        .map(
          (c: any, i: number) =>
            `[${i + 1}] ID: ${c.id}, Title: "${c.title}", Tags: ${c.tags.join(
              ", ",
            )}, Score: ${c.relevance_score.toFixed(2)}`,
        )
        .join("\n");

      const combinedText = `Summary:\\n\\n${summaryText}\\n\\nSources used (${citations.length}):\\n\\n${citationText}`;

      return {
        content: [
          {
            type: "text",
            text: combinedText,
          },
        ],
        structuredContent: {
          summary: summaryText,
          sources_used: citations.length,
          citations: citations,
        },
      };
    } catch (error: any) {
      return {
        content: [
          {
            type: "text",
            text: `Error generating summary and citations: ${error.message}`,
          },
        ],
        isError: true,
      };
    }
  }
);
Finally, we need to start the server using stdio. This means the MCP client will communicate with our server by reading and writing to its standard input and output streams. stdio is the simplest transport option and works well for local MCP servers launched as subprocesses by the client. Add the following code at the end of the file:
const transport = new StdioServerTransport();
server.connect(transport);
Now compile the project using the following command:
npx tsc index.ts --target ES2022 --module node16 --moduleResolution node16 --outDir ./dist --strict --esModuleInteropThis will create a dist folder, and inside it, an index.js file.
Load the MCP server into Claude Desktop
Follow this guide to configure the MCP server with Claude Desktop. In the Claude configuration file, we need to set the following values:
{
  "mcpServers": {
    "elasticsearch-rag-mcp": {
      "command": "node",
      "args": [   "/Users/user-name/app-dir/dist/index.js"
      ],
      "env": {
        "ELASTICSEARCH_ENDPOINT": "your-endpoint-here",
        "ELASTICSEARCH_API_KEY": "your-api-key-here",
        "OPENAI_API_KEY": "your-openai-key-here"
      }
    }
  }
}
The args value should point to the compiled file in the dist folder. You also need to set the environment variables in the configuration file with the exact same names defined in the code.
Test it out
Before executing each tool, click on Search and Tools to make sure that the tools are enabled. Here you can also enable or disable each one:

Finally, let’s test the MCP server from the Claude Desktop chat and start asking questions:
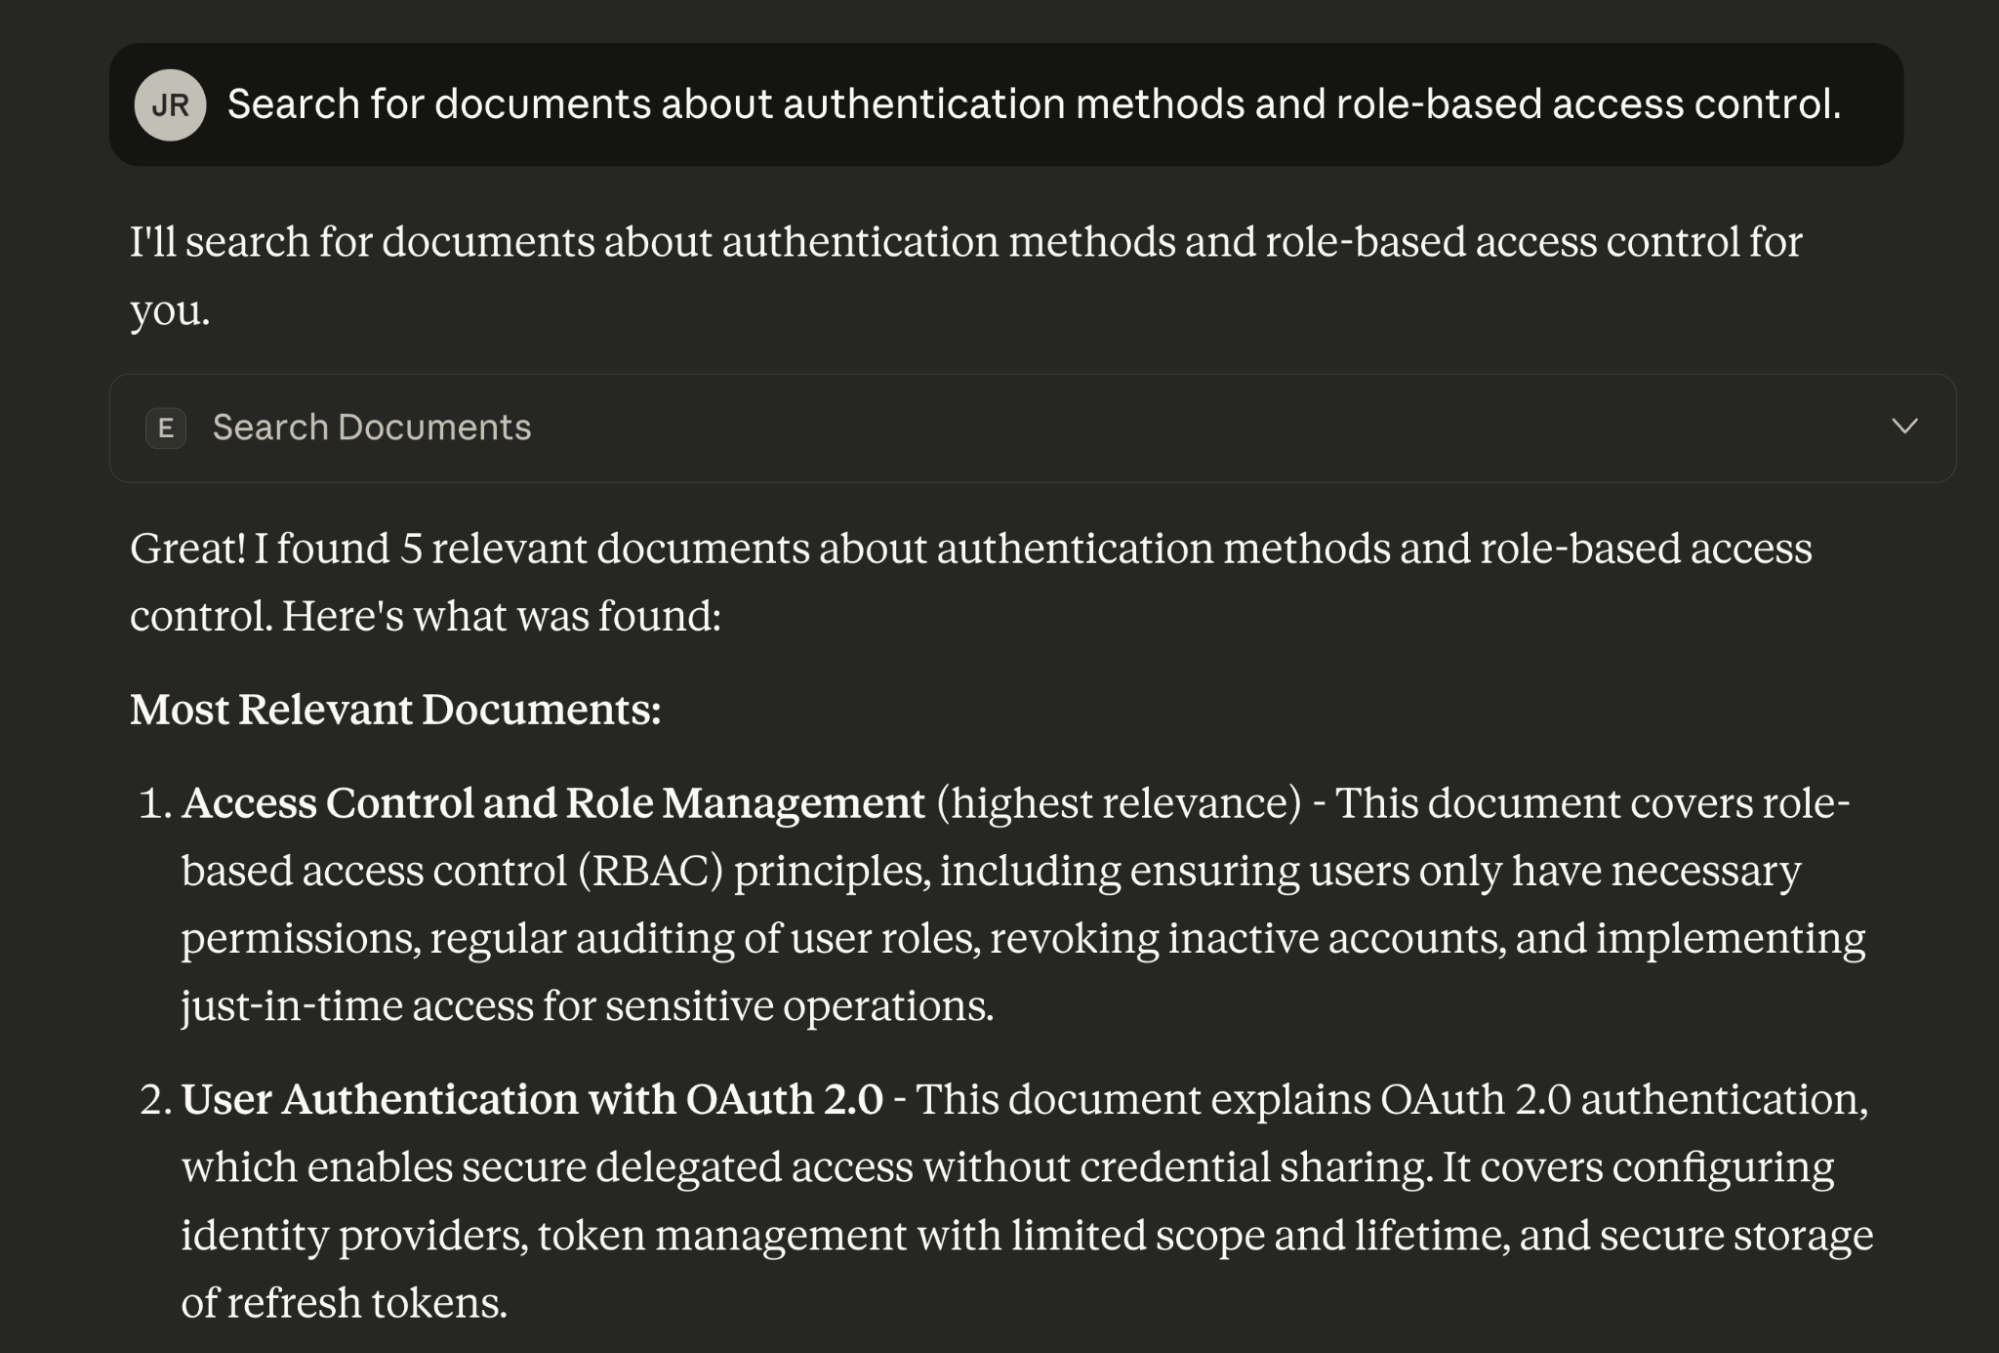
For the question “Search for documents about authentication methods and role-based access control”, the search_docs tool is executed and returns the following results:
Most Relevant Documents:
Access Control and Role Management (highest relevance) - This document covers role-based access control (RBAC) principles, including ensuring users only have necessary permissions, regular auditing of user roles, revoking inactive accounts, and implementing just-in-time access for sensitive operations.
User Authentication with OAuth 2.0 - This document explains OAuth 2.0 authentication, which enables secure delegated access without credential sharing. It covers configuring identity providers, token management with limited scope and lifetime, and secure storage of refresh tokens.
Container Security Guidelines - While primarily about container security, this document touches on access control aspects like running containers as non-root users and avoiding embedded credentials.
Incident Response Playbook - This mentions role assignment during incidents (incident commander, communications lead, etc.), which relates to access control in emergency scenarios.
Logging Standards for Microservices - This document includes guidance on avoiding logging sensitive information, which is relevant to authentication security.
The response is, “Great! I found 5 relevant documents about authentication methods and role-based access control. Here's what was found:”
The tool call returns the source documents as part of its response payload, which are later used to generate citations.
It’s also possible to chain multiple tools in a single interaction. In this case, Claude Desktop analyzes the user's question and determines that it needs to first call search_docs to retrieve relevant documents and to then pass those results to summarize_and_cite to generate the final answer, all without requiring separate prompts from the user:
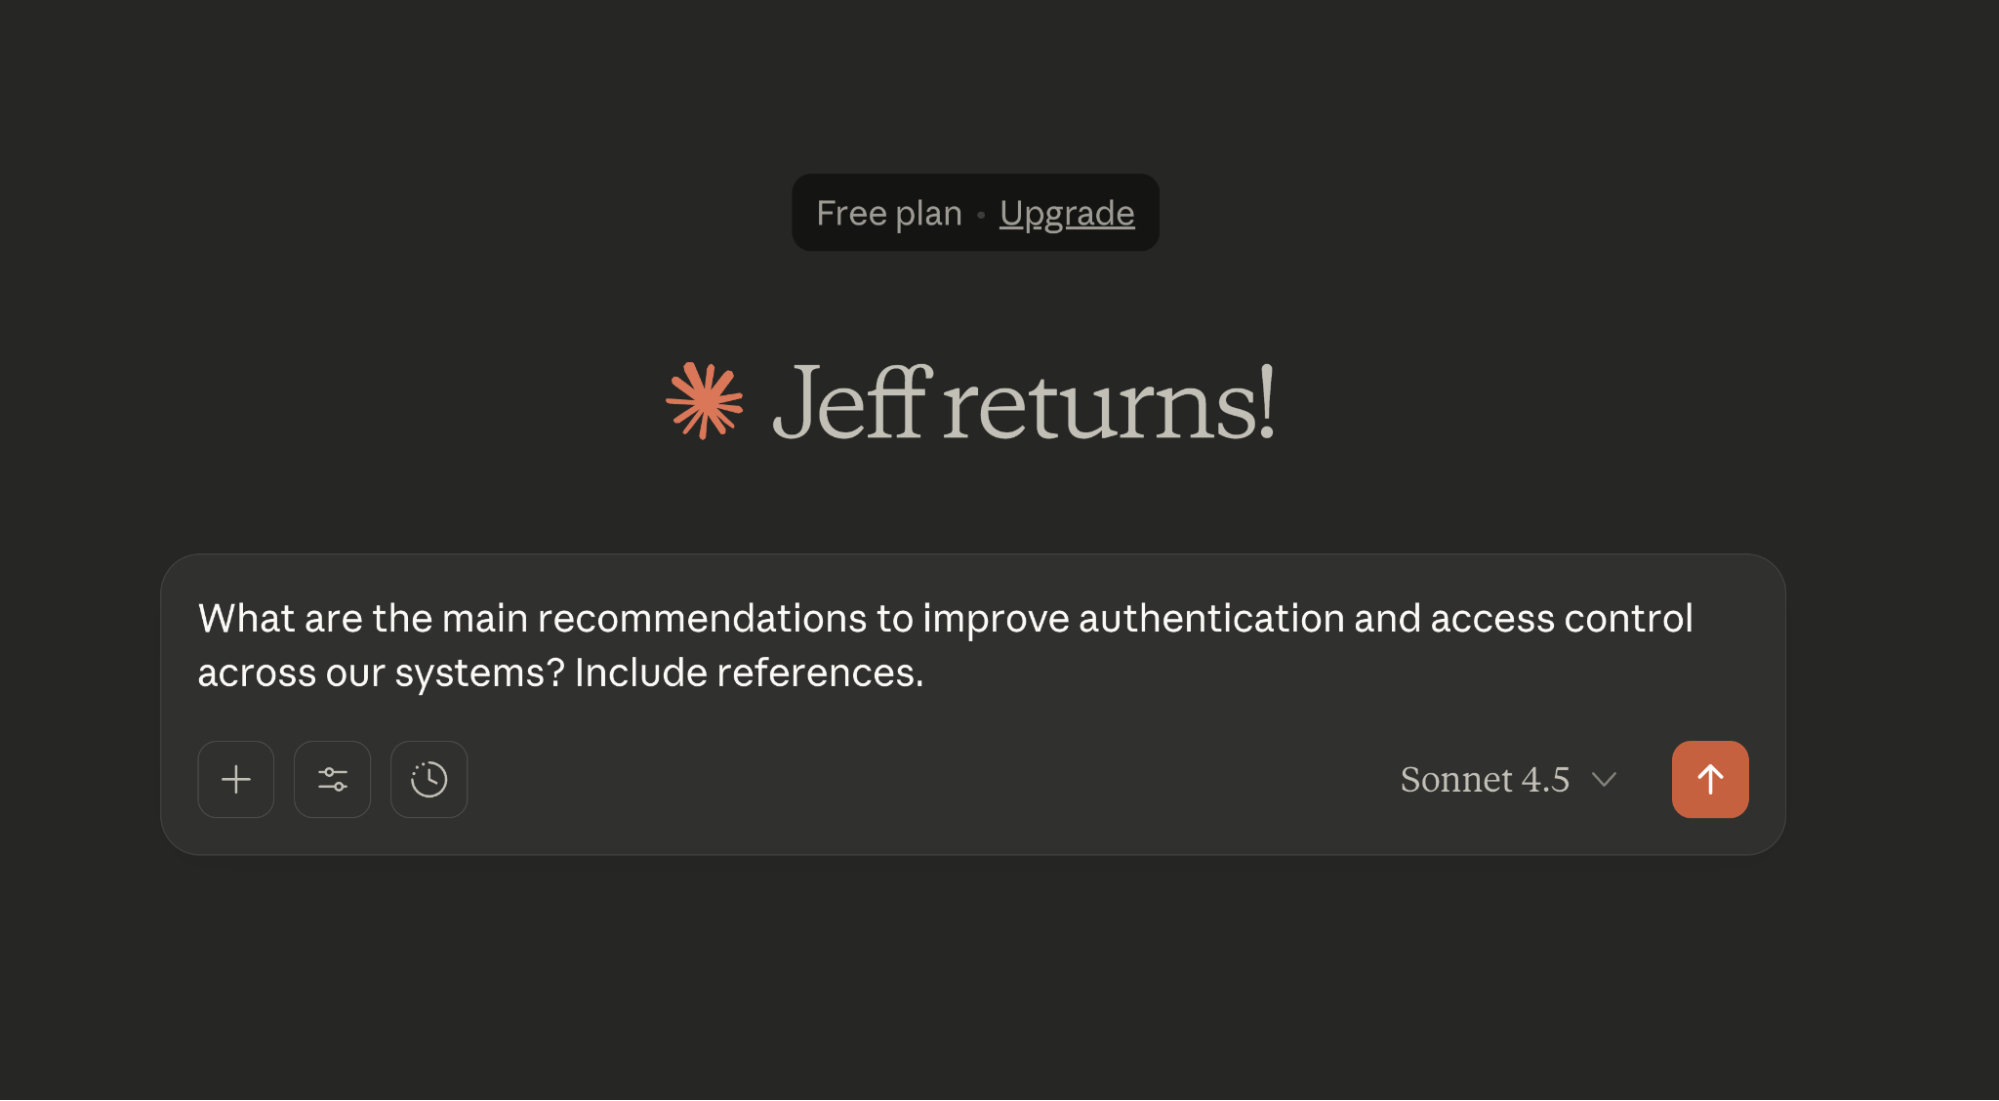
In this case, for the query “What are the main recommendations to improve authentication and access control across our systems? Include references.”, we obtained the following results:
Based on the documentation, here are the main recommendations to improve authentication and access control across your systems:

Key Recommendations

1. Implement Role-Based Access Control (RBAC)
Ensure users have only the permissions necessary for their job functions. This principle of least privilege minimizes security risks by limiting access to what's truly needed. [1]

2. Regular Access Audits
Conduct regular audits of user roles and promptly revoke access for inactive accounts. This helps prevent unauthorized access from dormant or compromised accounts. [1]

3. Just-in-Time (JIT) Access
Implement just-in-time access for sensitive operations, where permissions are granted only when needed and for a limited duration. This reduces the attack surface by minimizing standing privileges. [1]

4. OAuth 2.0 for Secure Authentication
Use OAuth 2.0 to enable secure delegated access without sharing user credentials. This protocol allows third-party applications to access resources on behalf of users without exposing passwords. [2]

5. Token Security and Management
Configure your identity provider to issue tokens with limited scope and lifetime

Store refresh tokens securely
Validate access tokens consistently to maintain security [2]
References

Access Control and Role Management (Tags: security, access-control)
User Authentication with OAuth 2.0 (Tags: authentication, oauth)
These recommendations work together to create a defense-in-depth approach, where multiple security layers protect your systems from unauthorized access.
As in the previous step, we can see the response from each tool for this question:
Note: If a submenu appears asking whether you approve the use of each tool, select Always allow or Allow once.

Conclusion
MCP servers represent a significant step toward standardizing LLM tools for both local and remote applications. Though full compatibility is still in the works, we’re moving fast in that direction.
In this article, we learned how to build a custom MCP server in TypeScript that connects Elasticsearch to LLM-powered applications. Our server exposes two tools: search_docs for retrieving relevant documents using Query DSL; and summarize_and_cite for generating summaries with citations via OpenAI models and Claude Desktop as client UI.
The future of compatibility between different client and server providers looks promising. Next steps include adding more functionalities and flexibility to your agent. There’s a practical article on how you can parameterize your queries using search templates to gain precision and flexibility.
Ready to try this out on your own? Start a free trial.
Want to get Elastic certified? Find out when the next Elasticsearch Engineer training is running!
Related content
May 26, 2026
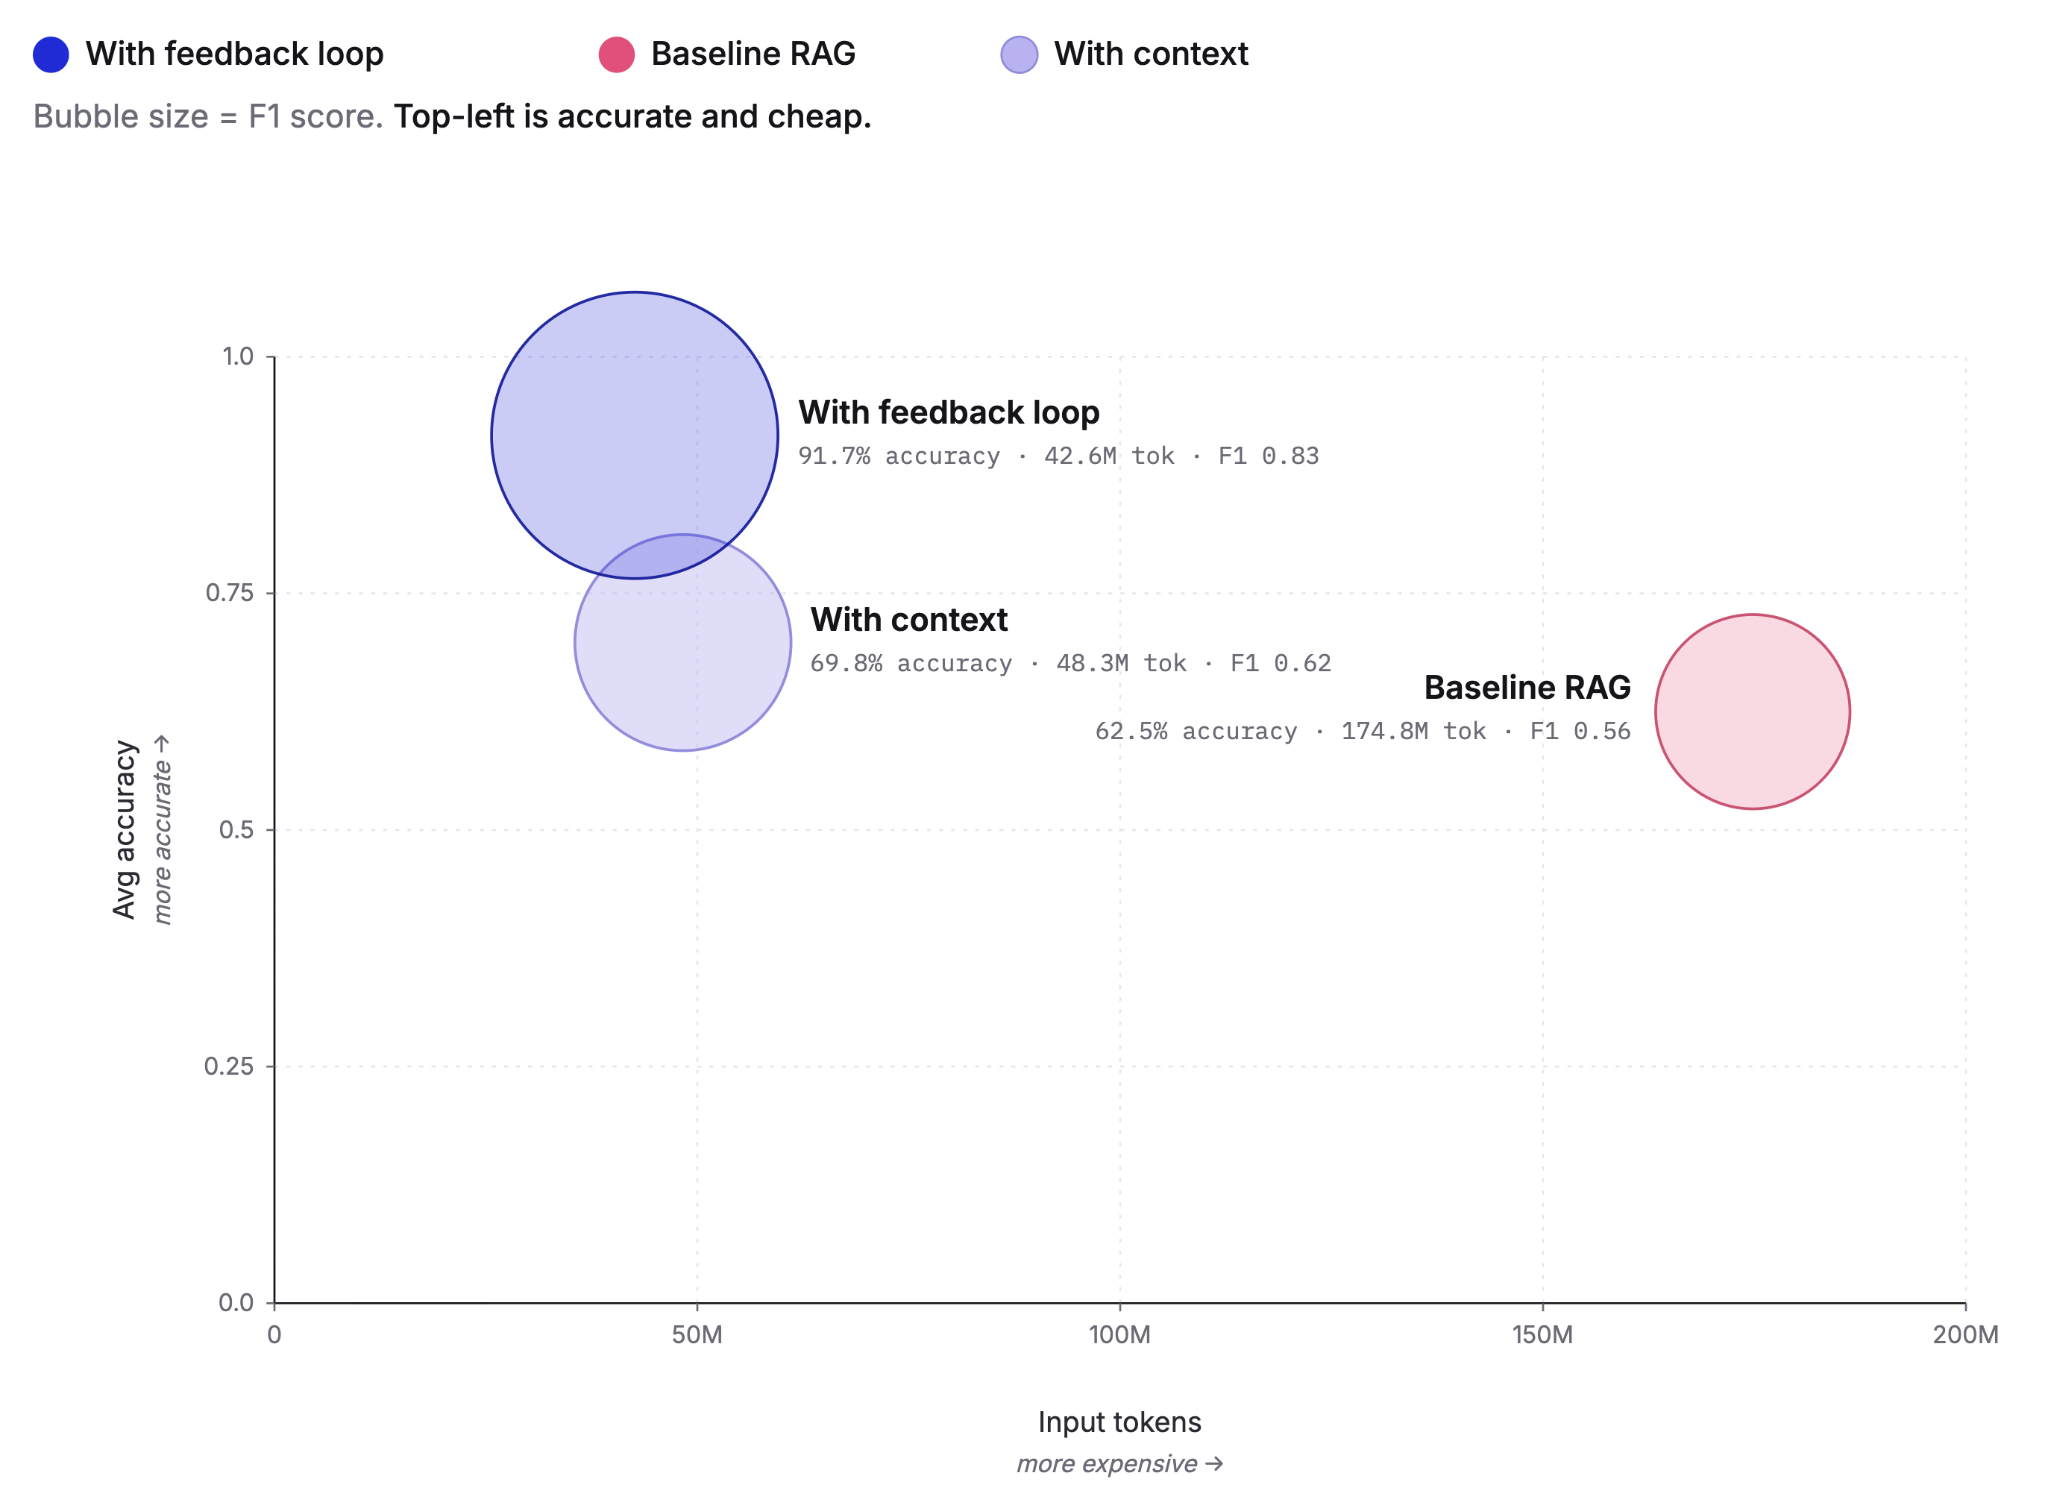
Cutting agent costs with pre-computed context
Pre-computing context as Knowledge Indicators reduces LLM agent token costs by up to 75% and improves answer accuracy from 60% to 92%. This post covers the extraction, retrieval and feedback loop that make it work, tested against the BrowseComp-Plus benchmark.
May 5, 2026
Elastic Agent Builder: How we taught AI agents to manage their own context
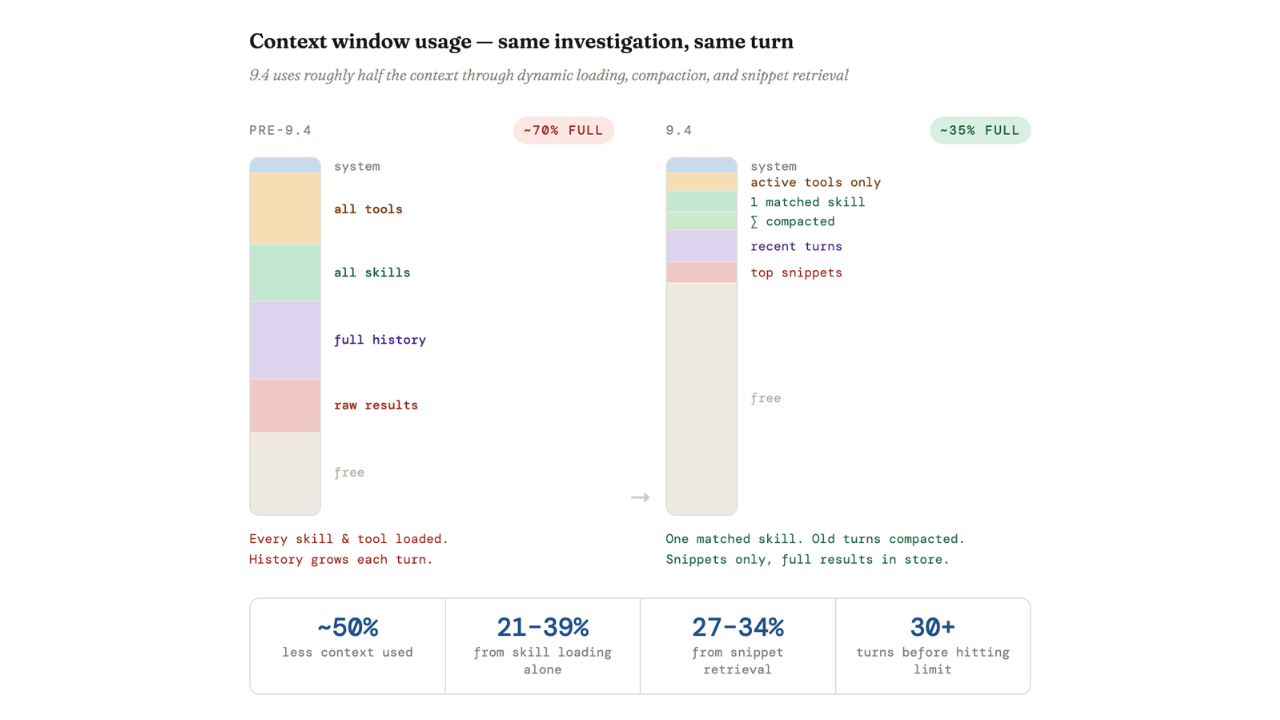
Agent Builder in Elasticsearch 9.4 ships dynamically loaded skills, a conversation context store, selective compaction, and external connectors to cut token costs by 40% and let agents handle their own context management.

April 29, 2026
Elastic-caveman: Cutting AI response tokens by 64% without losing the best of Elastic
Learn how to use elastic-caveman to cut AI response tokens while keeping the Elastic agentic brilliance.
April 8, 2026
How to build agentic AI applications with Mastra and Elasticsearch
Learn how to build agentic AI applications using Mastra and Elasticsearch through a practical example.

March 23, 2026
Using Elasticsearch Inference API along with Hugging Face models
Learn how to connect Elasticsearch to Hugging Face models using inference endpoints, and build a multilingual blog recommendation system with semantic search and chat completions.